


charlyselo
-
Posts
292 -
Joined
-
Last visited
-
Days Won
6
Reputation Activity
-

 charlyselo reacted to DarthFunk83 in Line/Staff Officer Service Dress, proposal.
Historically, CRLs had to be made according to visual references, and typically require at least 3 good pics with pictures showing the front, back and sides. Written answers from costume designers, etc could be used as supporting info, but not the main thing. So, based on that, I still think no hats. But that's just my two cents
-

 charlyselo got a reaction from PArmstr in Warrant Officer update, proposal
Ok. I didn't research this suit enough to have a solid opinion, so I trust you
-
charlyselo reacted to PArmstr in Possible ISB ANH CRL
I am just posting something to pull this up on the thread list.
-
charlyselo reacted to Prida in Line/Staff Officer Service Dress, proposal.
Slightly off topic; but having only started my build this year this process is fascinating! It's great to hear everyone's point of view on it all (I need to see the film so I can't comment) and how the proposal is growing.
-
 charlyselo got a reaction from Prida in Line/Staff Officer Service Dress, proposal.
With this youtube quality videos it's very difficult to know which rank bar are they using. I'm pretty sure that at least for black officer, his rank bar is six blue tiles, that's what I could see while watching the movie. But I'm with Sean, we should wait for better quality references.
BTW, today I order this six blue tiles rank bar from philoprops, and a pair of R1 style dosimeters. They should arrive in a couple of weeks. With that I think I will be ready for Mess Dress level 3
-
 charlyselo got a reaction from bobafett4ever in Line/Staff Officer Service Dress, proposal.
Maybe the Science Officer could be a variant for the Olive Mess Dress, as we have at the ISB for the R1 specifics requirements.
Rogue One Science Officer Specific Requirements
As above but adding the following items.
Dress Shirt Cuffs
White or cream colored dress shirt cuffs are slightly visible, protruding from under the olive tunic; if an undershirt is used, ensure the undershirt's collar is not visible. Rank Bar
Four yellow or amber tiles followed by one red tile. Code Cylinders Two code cylinders are worn, one in each pocket. Dosimeter style: True Dosimeter with correct clip and Blue top. OPTIONAL Level two certification (if applicable): Dosimeters have a silver, non-brass, clip. -
charlyselo got a reaction from bobafett4ever in Line/Staff Officer Service Dress, proposal.
That depends if we're goint to keep the Science Officer as a separate CRL or not. For me it's ok to combine Science and Mess Dress Olive into single one, but if we finally keep the Science officer, I think we should not allow that rank bar for Mess Dress, as it's not seen in SOLO.
That also means for Mess Dress Black we should only allow a rank bar with 6 blue tiles (for level 3).
-
charlyselo reacted to Mitthrawnuruodo in Line/Staff Officer Service Dress, proposal.
I'd like to see these costumes be separate from the Science Officer, since the Science Officer specifically has the cream colored shirt cuffs.
I do love seeing more people excited about these costumes. Getting this to be a CRL will bring more members into the IOC, helping people be officers that can't wear those knee high boots.
-
 charlyselo got a reaction from trencher in Solo - and new uniforms!
ID Imperial Officer: Staff Officer Mess Dress (Black)
ID Imperial Officer: Line Officer Mess Dress (Olive)
Sounds good. What about the sience officer then? We keep it as an special suit, or just combine it with Line Mess Dress?
-
charlyselo got a reaction from PArmstr in Line/Staff Officer Service Dress, proposal.
Coming from this post:
I think que should discuss this two new uniforms on their own threads.
Taking Science Officer CRL as a template, here is what I propose:
---------------------------------------------------------------------------------------------
Description: Imperial Line/Staff Service Dress (Olive Drab/Black)— SOLO
Prefix: ID
Detachment: Imperial Officer Corps
Context: SOLO
Required Costume Components The following costume components are present and appear as described below.
Tunic, Olive/Black Fabric is an olive (black) colored medium weight suiting material exactly matching the pants. Gabardine / twill weave is preferred. Tunic is double-breasted with a left over right closure on the tapered yoke. Yoke comes up across the shoulder to the top shoulder seam. The standing collar has square corners and is tall, raising to mid-neck on wearer. Collar closes snugly and includes a modesty panel behind closure. There are code cylinder pockets on both outside panels of the jacket from about half way between the top and bottom on the arm hole. Sleeves extend to or slightly past the wrist, and are without decoration, cuffs or buttons. Tunic is constructed with no top-stitching (stitches visible on the exterior surface of fabric). Hook and eye fasteners on the uniform should not be visible.
OPTIONAL Level two certification (if applicable): There is a dart of about 2" (50.8 mm) in the top center of the yoke. There is a seam running the entire circumference of the tunic, dividing it along a line hidden by the uniform belt. Princess seams, to check. OPTIONAL Level three certification (if applicable):
Tunic is secured on the right side by snaps or buttons. Tunic is lined.
Rank Bar Worn on the left side of the tunic over the heart. Rank consists of colored plastic tiles mounted on metal bar. Four yellow or amber tiles followed by one red tile. Bar is approximately 1" in height and approximately 4 inches in length. Single bar rank bars approximately 1" in height with a length that varies depending on the number of tiles. Rank tile dimensions are appropriate and proportional to the sizing of the bar to allow for equidistant and even spacing from each other and the border of the bar. Rank tiles are translucent.
OPTIONAL Level two certification (if applicable):
Rank chosen must be referenced from film canon officers (SOLO). OPTIONAL Level three certification (if applicable):
Rank consists of colored plastic push buttons mounted on a metal bar.
Code Cylinders Two code cylinders are worn, one in each pocket. Between 1 to 4 per costume may be worn. Dosimeter style: True Dosimeter with correct clip and Blue top.
OPTIONAL Level two certification (if applicable): Dosimeters have a silver, non-brass, clip.
Belt The belt is constructed from a non-textured leather or a leather-like material. Belt is approximately 2" (50.8 mm) to 3" in width. There are no loops on the belt. A single large snap or rivet is visible approximately 1" (25.4 mm) from the buckle. The buckle is constructed from a horizontally brushed metal, or metal looking material. The buckle size is approximately 2 5/8" (66.7 mm) high and 4 1/8" (104.5 mm) wide with 0.5" (12.7 mm) radius rounded corners. Buckle is adorned with an Imperial Code Disk at the center. OPTIONAL Level two certification (if applicable): Belt is made of leather. Buckle has a slight horizontal curve.
Trousers, Olive/Black
Fabric is an olive (black) colored medium weight suiting material exactly matching the tunic. Gabardine / twill weave is preferred. Trousers have straight legs, and are not jodphurs or tights. Visible pockets are not allowed. Trouser hem should rest on top of the footwear while in a standing position; ankles are not to be seen. Footwear
Ankle-high, black, lace-less, smooth non-textured, and made of leather or leather-like material. There is no decorative stitching, buckles, snap tabs, or decoration. Shoes have conservative heels.
Science Officer (Rogue One) Specific Requirements
(only for Line Officer Service Dress CRL)
As above but utilizing the following dress shirt cuffs and rank bar.
Dress Shirt Cuffs
White or cream colored dress shirt cuffs are slightly visible, protruding from under the olive tunic; if an undershirt is used, ensure the undershirt's collar is not visible.
Rank Bar Worn on the left side of the tunic over the heart. Rank consists of colored plastic tiles mounted on metal bar. Four yellow or amber tiles followed by one red tile. Bar is approximately 1" in height and approximately 4 inches in length. Rank tile dimensions are appropriate and proportional to the sizing of the bar to allow for equidistant and even spacing from each other and the border of the bar. Rank tiles are translucent.
OPTIONAL Level two certification (if applicable): OPTIONAL Level three certification (if applicable): Rank consists of colored plastic push buttons mounted on a metal bar. ------------------------------------------------------------------------------------
This is just a copy/paste from Science Officer CRL, I only eliminate the 'Dress Shirt Cuffs' from it.
What do you think?
-
charlyselo got a reaction from PArmstr in Line/Staff Officer Service Dress, proposal.
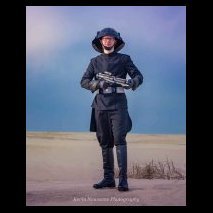
So here are some pics of my Staff Officer Mess Dress. Straight leg trousers, regular staff jacket, chealsea boots and a rank bar not se en in Solo, but it's the only one I have at the moment. Also, dosimeters are brass clip.
Ley me know what you think
PD: These photos are not meant to be used at the CRL, they're just to show an example of what we want to do.
-
 charlyselo got a reaction from Trapper in Line/Staff Officer Service Dress, proposal.
So here are some pics of my Staff Officer Mess Dress. Straight leg trousers, regular staff jacket, chealsea boots and a rank bar not se en in Solo, but it's the only one I have at the moment. Also, dosimeters are brass clip.
Ley me know what you think
PD: These photos are not meant to be used at the CRL, they're just to show an example of what we want to do.
-
charlyselo got a reaction from PArmstr in Solo - and new uniforms!
ID Imperial Officer: Staff Officer Mess Dress (Black)
ID Imperial Officer: Line Officer Mess Dress (Olive)
Sounds good. What about the sience officer then? We keep it as an special suit, or just combine it with Line Mess Dress?
-
 charlyselo got a reaction from Exaldear in Solo - and new uniforms!
ID Imperial Officer: Staff Officer Mess Dress (Black)
ID Imperial Officer: Line Officer Mess Dress (Olive)
Sounds good. What about the sience officer then? We keep it as an special suit, or just combine it with Line Mess Dress?
-
 charlyselo got a reaction from Fletcher in Line/Staff Rain Poncho by charlyselo
A few months ago, in January to be more exact, I made a rain poncho, guiding me a little about Angelus' work and screenshots of the film.
I made a tutorial for the forum of Spanish Garrison, and now I will be translating it here little by little. I hope you like it
--------------------------------------------------------------------
Fabric: Black nylon 100% waterproof. 3 meters x 1.5 meters.
The rain poncho consist in three main parts: yoke and collar(blue), cape (black) and breastplate(green).
Let's go with the first one.
Cape
Cape is the most easy part. Consist of two rectangles, wich length is the size from the neck to the upper part of the boots, and width comes from the same point of the neck to the top of your fingers, putting your arms cross.
Then you have to sew it together only on the red line, a little bit more of the half.
Yoke and collar
This part consist in another four parts: back, front right side, front left side and collar.
Back:
I give you mi sizes as reference. It's based on a XL size from CosplaySky suit.
On the last image, the red line correspond to the seams need to be visible, about a 1" from the border.
Next, the front left side (from the wearer's point of view) consist in two pieces:
H.2 and H.3 need to be sew it together at the middle. H.3 will be on top of the front right piece. H.4 is the front right piece:
Now that's how it should look:
Grey part from H.4 will be hidden by H.3
Again, visible seams are required. Red are 1" from the border, blue are 1/2":
Bib
So sorry if 'bib' it's not the correct name for this piece.
The bib is quite simple to make. It consists of four sections, namely: two symmetrical sections, one inch wide, which will go on each side of the bib. A four-inch section on the left side, seen from the front, which will contain the pocket for the dosimeters, and finally a fourth central section.
The two outer sections will go down to the edge of our suit jacket, while the other two inner sections will be two inches longer. Remember, once again, to leave seam allowances when cutting the fabric.
The pocket in my case I made it four inches deep, enough to contain the dosimeters (at least the ones I have, manufactured by Malakili). For this I simply cut that section with the calculated length, plus twice the depth of the pocket, that is, eight inches. In this way simply by folding we get the pocket.
The fourth and last section, the central one, is the simplest. Simply calculate the width to fill in the full width of the shoulder / neck part.
And finally the visible seams. Across the bottom, seam to approximately a quarter of an inch to finish off the edge. Another quarter-inch seam in the center section over the pocket section. And most importantly, two cross seams in the pocket section. One inch horizontally from the edge of the pocket, and another vertically one inch to the left of the section. In this way we will "divide" the pocket in two, one of an inch almost useless and the other of three inches where the dosimeters will go. Earlier I said that this section will be four inches, although we now have a pocket really three inches wide. Keep in mind that a pocket less than two and a half inches wide we can have trouble putting two dosimeters.
Another measure that I have forgotten to comment on before, is that the pocket will be approximately two inches from the top edge.
And another thing to keep in mind when joining the three parts of the poncho, is that you have to form a "sandwich" in the following order from outside to inside: shoulders, cape and bib. I will leave some photos where I hope you can see well what I mean.
-
charlyselo got a reaction from Exaldear in Revamp
Both ideas are good solutions, and maybe re-organice the existing CRLs will be more easy, so go for it!
-
 charlyselo got a reaction from LTCAlex in Line/Staff Rain Poncho by charlyselo
Actually I'm making ponchos for some officers from Spanish Garrison. I didn't offer it here because I don't have all the time that I want, but maybe in a nearly future -
 charlyselo got a reaction from BlackJade in Line/Staff Rain Poncho by charlyselo
A few months ago, in January to be more exact, I made a rain poncho, guiding me a little about Angelus' work and screenshots of the film.
I made a tutorial for the forum of Spanish Garrison, and now I will be translating it here little by little. I hope you like it
--------------------------------------------------------------------
Fabric: Black nylon 100% waterproof. 3 meters x 1.5 meters.
The rain poncho consist in three main parts: yoke and collar(blue), cape (black) and breastplate(green).
Let's go with the first one.
Cape
Cape is the most easy part. Consist of two rectangles, wich length is the size from the neck to the upper part of the boots, and width comes from the same point of the neck to the top of your fingers, putting your arms cross.
Then you have to sew it together only on the red line, a little bit more of the half.
Yoke and collar
This part consist in another four parts: back, front right side, front left side and collar.
Back:
I give you mi sizes as reference. It's based on a XL size from CosplaySky suit.
On the last image, the red line correspond to the seams need to be visible, about a 1" from the border.
Next, the front left side (from the wearer's point of view) consist in two pieces:
H.2 and H.3 need to be sew it together at the middle. H.3 will be on top of the front right piece. H.4 is the front right piece:
Now that's how it should look:
Grey part from H.4 will be hidden by H.3
Again, visible seams are required. Red are 1" from the border, blue are 1/2":
Bib
So sorry if 'bib' it's not the correct name for this piece.
The bib is quite simple to make. It consists of four sections, namely: two symmetrical sections, one inch wide, which will go on each side of the bib. A four-inch section on the left side, seen from the front, which will contain the pocket for the dosimeters, and finally a fourth central section.
The two outer sections will go down to the edge of our suit jacket, while the other two inner sections will be two inches longer. Remember, once again, to leave seam allowances when cutting the fabric.
The pocket in my case I made it four inches deep, enough to contain the dosimeters (at least the ones I have, manufactured by Malakili). For this I simply cut that section with the calculated length, plus twice the depth of the pocket, that is, eight inches. In this way simply by folding we get the pocket.
The fourth and last section, the central one, is the simplest. Simply calculate the width to fill in the full width of the shoulder / neck part.
And finally the visible seams. Across the bottom, seam to approximately a quarter of an inch to finish off the edge. Another quarter-inch seam in the center section over the pocket section. And most importantly, two cross seams in the pocket section. One inch horizontally from the edge of the pocket, and another vertically one inch to the left of the section. In this way we will "divide" the pocket in two, one of an inch almost useless and the other of three inches where the dosimeters will go. Earlier I said that this section will be four inches, although we now have a pocket really three inches wide. Keep in mind that a pocket less than two and a half inches wide we can have trouble putting two dosimeters.
Another measure that I have forgotten to comment on before, is that the pocket will be approximately two inches from the top edge.
And another thing to keep in mind when joining the three parts of the poncho, is that you have to form a "sandwich" in the following order from outside to inside: shoulders, cape and bib. I will leave some photos where I hope you can see well what I mean.
-
 charlyselo got a reaction from CaptainCunning in Line/Staff Rain Poncho by charlyselo
A few months ago, in January to be more exact, I made a rain poncho, guiding me a little about Angelus' work and screenshots of the film.
I made a tutorial for the forum of Spanish Garrison, and now I will be translating it here little by little. I hope you like it
--------------------------------------------------------------------
Fabric: Black nylon 100% waterproof. 3 meters x 1.5 meters.
The rain poncho consist in three main parts: yoke and collar(blue), cape (black) and breastplate(green).
Let's go with the first one.
Cape
Cape is the most easy part. Consist of two rectangles, wich length is the size from the neck to the upper part of the boots, and width comes from the same point of the neck to the top of your fingers, putting your arms cross.
Then you have to sew it together only on the red line, a little bit more of the half.
Yoke and collar
This part consist in another four parts: back, front right side, front left side and collar.
Back:
I give you mi sizes as reference. It's based on a XL size from CosplaySky suit.
On the last image, the red line correspond to the seams need to be visible, about a 1" from the border.
Next, the front left side (from the wearer's point of view) consist in two pieces:
H.2 and H.3 need to be sew it together at the middle. H.3 will be on top of the front right piece. H.4 is the front right piece:
Now that's how it should look:
Grey part from H.4 will be hidden by H.3
Again, visible seams are required. Red are 1" from the border, blue are 1/2":
Bib
So sorry if 'bib' it's not the correct name for this piece.
The bib is quite simple to make. It consists of four sections, namely: two symmetrical sections, one inch wide, which will go on each side of the bib. A four-inch section on the left side, seen from the front, which will contain the pocket for the dosimeters, and finally a fourth central section.
The two outer sections will go down to the edge of our suit jacket, while the other two inner sections will be two inches longer. Remember, once again, to leave seam allowances when cutting the fabric.
The pocket in my case I made it four inches deep, enough to contain the dosimeters (at least the ones I have, manufactured by Malakili). For this I simply cut that section with the calculated length, plus twice the depth of the pocket, that is, eight inches. In this way simply by folding we get the pocket.
The fourth and last section, the central one, is the simplest. Simply calculate the width to fill in the full width of the shoulder / neck part.
And finally the visible seams. Across the bottom, seam to approximately a quarter of an inch to finish off the edge. Another quarter-inch seam in the center section over the pocket section. And most importantly, two cross seams in the pocket section. One inch horizontally from the edge of the pocket, and another vertically one inch to the left of the section. In this way we will "divide" the pocket in two, one of an inch almost useless and the other of three inches where the dosimeters will go. Earlier I said that this section will be four inches, although we now have a pocket really three inches wide. Keep in mind that a pocket less than two and a half inches wide we can have trouble putting two dosimeters.
Another measure that I have forgotten to comment on before, is that the pocket will be approximately two inches from the top edge.
And another thing to keep in mind when joining the three parts of the poncho, is that you have to form a "sandwich" in the following order from outside to inside: shoulders, cape and bib. I will leave some photos where I hope you can see well what I mean.
-
 charlyselo got a reaction from GDMorti in Revamp
I think that the current distribution it's not bad. One section for officers, one for crew, one for navy/fleet troopers. If something changed, maybe it would be to divide the officers section in two, one for the films, one for the rest (comics, tv shows, videogames, etc), as this section it's becoming bigger. But it's not really too much necessary..
One thing that I agree with you, is that we need to separate some CRLs, that's for sure...
-
charlyselo got a reaction from Exaldear in Revamp
I think that the current distribution it's not bad. One section for officers, one for crew, one for navy/fleet troopers. If something changed, maybe it would be to divide the officers section in two, one for the films, one for the rest (comics, tv shows, videogames, etc), as this section it's becoming bigger. But it's not really too much necessary..
One thing that I agree with you, is that we need to separate some CRLs, that's for sure...
-
charlyselo got a reaction from PArmstr in Staff Officer (black) CRL Update to R1 specifications
I saw it too, and I'm pretty sure he was wearing 6 blue tiles rank badge, two dosimeters, one on each side, and no hat.
-
 charlyselo got a reaction from Tonydragon in CRL Idea: Combine Navy Trooper IN Dress & Staff Officer
Humm, the NT CRL needs a revisit, that's for sure. But I don't know if combine the Staff Officer (non 451) with the NT it's gonna be 100% correct.
What I would do, is made an update for the Staff with the FO boots, NT helmet, short gloves, maybe straight pants and chelsea boots. Defining very specifically all the variations (not allow straight pants with NT helmet, for example).
On the other hand, re-elaborate the NT CRL listing all the alternatives with more description, eliminate the RO version with rank badge and dosimeters, as we suposed that guy was an officer, not a NT, and finally add two SOLO versions, one with armour, maybe FO boots and another one with rain poncho without rank badge/dosimeters, etc. And also I would change the name from Navy Trooper to Fleet Trooper, as Disney refers to him with that name, but that's just my opinion.
Doing it in that way, were gonna have two CRL very similars, but I think it's going to be more accurate.
-
charlyselo got a reaction from PArmstr in CRL Idea: Combine Navy Trooper IN Dress & Staff Officer
Yes, all the Navy Troopers that I refer are the Dress uniform version. So, just to resume if I don't misunderstand you, we will have:
ANH Staff Officer (current) ESB/RotJ/R1/SOLO Staff Officer (updated) ANH Warrant Officer/Navy Trooper Dress uniform (new) ESB/RotJ Warrant Officer (updated) R1 Navy Trooper Dress uniform ESB/RotJ Navy Trooper Dress uniform SOLO Navy Trooper Dress uniform