


Kqueen
-
Posts
7 -
Joined
-
Last visited
Reputation Activity
-

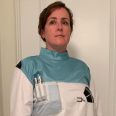 Kqueen got a reaction from Goonie in Death Star Scientist CRL for Mandalorian Season 2
Thanks for the pictures Laubi. I did see that maybe only one code cylinders is put on the left pocket of those 2 pockets. I did also see on the collar back, that threre is somekind of closure stap, which goes over the zipper. I did see that closure trap also in the rogue one version. There a side view with several Scientist heads from the left side. I don't have a 4K System at home, maybe Laube you can make picture of the rogue one closure stap for detechment staff.
-
Kqueen reacted to Laubi in Death Star Scientist CRL for Mandalorian Season 2
I don't think these are the same suits... pattern is slightly different seeing those pics we have alone. Here is the most obvious difference, or at least the one I noticed first:
For the frontside Insignia, I'd say there are no letters added to the logo, but this is the best picture I have right now:
I think we'll see more of them in future episodes, at least I hope so.
-
Kqueen reacted to ImpOfficer in Death Star Scientist CRL for Mandalorian Season 2
I'm pretty sure the costume is the same as in Rogue One. Only the emblem has been replaced. I love that they stick to the idea of unifying the costumes, rather than creating many varieties, as in OT. I also remember that in one Darth Vader comic, there was a medical worker in the same suit. However, there was the emblem of the mudtrooper medic. I believe that the costume designers decided that it would be logical to distinguish scientists from different departments with their emblems.
-
Kqueen reacted to Hask in Death Star Scientist CRL for Mandalorian Season 2
To be honest if all goes how I hope this will be an easy thing to do
-
Kqueen reacted to lantern2745 in Death Star Scientist CRL for Mandalorian Season 2
Wendy, and Andreas - You two certainly know this costume better than I, so your research will be what is leaned on.
The pants legs seems to be the same to me (as how they are at the boot tops I mean). And there is a seam down the center of the back still, so I'd think the zipper is hidden there.
The colored yoke part does seem shorter. It looks to end at the bottom of the arm hole.
We can just barely see the logo on the front, but I can't tell if there is any Aurabesh lettering like on the R1 costume.
Unless we see them again, or get a Visual Guide reference (crossing my fingers) We would likely do as Kris said, and tweak the existing CRL to accomodate the Imperial Department of Research version as well.
That would probably include a name change to "Imperial Science Technician" or something along those lines.
- Jeff
-
Kqueen reacted to vonmoen in Death Star Scientist CRL for Mandalorian Season 2
Actually that logo on their backs is for the Imperial Department of Military Research.
-
Kqueen got a reaction from Goonie in Death Star Scientist CRL for Mandalorian Season 2
Actually I would propose to make a new CRL for the new scientists. I did find other changes like the shape of the grey/black Shoulder parts, the heigth of the blue yoke pattern, there is no zipper on the back... And we do need a new name for those scientists.
-
Kqueen reacted to Angelus in Build on Galen Erso - Tarkin Initiative (Eadu)
Costuming:Galen Erso - Tarkin Initiative - Databank
Those who want to do Galen Erso (Eadu) from Rogue One.
Top Yock of Galen Erso's
Rem to do the pockets for the codes to be put in.
I did try gray color on the early stage. It did not work out as what the design was when I was watching the movie again.
Just to show you how it looks like if it was gray color (The top). Base on the research that me and some of the people from IOC.
For the Top Mint color fabric:
I got from this store
Spotlight - Premium Cotton Sateen Fern
you can kind of see the different with both of the color.
The question on how I wear the top part, I did a collar on kind so I can fit inside. In the early stage, I did try to sew all up in one go, but my head just can not fit inside the collar . so I did like this.
This is how it looks like over all. After I redo and show the right olive color.
-
 Kqueen reacted to Paggeldiwwer in General Pattern for an officers' tunic
Hello fellow officers.
more than two years ago, when I became a member here, I noticed (as many before and after me) that it is hard to find a pattern here for the tunic.
I have sewed a few of those tunics since then (as an amateur - it's just a hobby ) and I just made a small photo-documentation of my recent progress.
I photographed the single pieces from which the tunic will be constructed and drawed in the measurements of them. I hope this will help some of you to create an own pattern for your tunic. And even if you haven never seriously sewed before (like me more than two years ago) - just do it, give it a try. You'll like it - believe me It is such a great feeling seeing the progress of your own project. And you do not need to work it out by hook or by crook - take yourselves the time you need. This includes re-opening of some seams sometimes. But you'll to this for the better.
The pattern is designed for my father, so it is customized. That means the single parts are made to meet his measurement - not yours. You will need to alter them to make the tunic fit your own body.
My fathers measurements are: 176 cm tall, weight 76kg, chest is 108cm waist is 110cm, back from neck to hip: 42cm, arm length: 62 cm, neck-circumference: 42cm.
Please alway keep in mind, that we need about 10-15mm of seam-allowance at each and every edge of the fabric. Before you sew all of that together, it appears a lot larger of course
The collar:
The chest-pieces:
Right Side:
Left Side:
Double-breast:
The arm-pieces:
The back-pieces:
Construction (where do these parts all have to be placed?):
Right front:
Left front and double-breast:
Back:
(please mind that the center-seam is just here for the Admiral Versio-Uniform. For a regular officer there is no center-seam at all!!!)
Arms:
How to start:
Draw on the pattern-parts and cut them out of the fabric:
Draw them on the facing again an cut those parts too:
Iron the facing onto the inner side of the fabric:
cut of the excess-facing:
This will be continued....
-
Kqueen reacted to Paggeldiwwer in Why an IOC costume?
When i joined the Legion in january 2015 I did so with my Stormtrooper, just a common ANH Stunt. At my very first troop a fellow asked me why I was doing a Stromtrooper. My answer was, that I like the armor and the style and feel good while wearing this. He smiled at me and said: "That was not what I meant! I see you and I think you should do Grand Moff Tarkin!" My first thought was, this was a silly idea. The more I pondered about that, the more interesed I became in the character. I ordered a simple CosplaySky-Uniform, found some nice leather-riding-boots, ordered the dosimeters and the disc for the belt-buckle, build my belt myself, tested the makeup and the haircolor, did some pictures and got Tarkin approved to be my second costume in the Legion.
But I did not like the CosplaySky-Uniform very much. So I started to sew a new uniform by myself. It took me four weeks and I was in constand contact with @bjsavage7 in those days. And after all the sewing there it was: my first selfmade uniform. Even though I used this uniform for more than a year then, I got in contact with @furiosa in early 2016 and we started the research for the real cavlary twill in the accurate color. The rest is history: Antje made my new uniform out of the wonderful fabric and that improved my Tarkin the most.
Besides Grand Moff Tarkin I have a regular Line Officer, an Admiral Tarkin TCW and a Scanningcrew.
-
Kqueen reacted to Angelus in Line/Staff/Krennic Poncho
1# The back have Top-stitched that part which is you are pointing . Like the krennic's picture below
2# The split starts around the butt level. For the front and back of that end part here are the photos.
The back part along the sides of the cape I add around 2inc of it to cover up the serged edges as if you see on Krennic's cape on his picture you can see it for the front and back. Just for the front part of the cape (here the arm come out from), I put about 1.5inc for the back.
3# This cape which is my V.5.... I have not top-stitching it down (ie......have not finish it...)
-
Kqueen reacted to charlyselo in Line/Staff Rain Poncho by charlyselo
A few months ago, in January to be more exact, I made a rain poncho, guiding me a little about Angelus' work and screenshots of the film.
I made a tutorial for the forum of Spanish Garrison, and now I will be translating it here little by little. I hope you like it
--------------------------------------------------------------------
Fabric: Black nylon 100% waterproof. 3 meters x 1.5 meters.
The rain poncho consist in three main parts: yoke and collar(blue), cape (black) and breastplate(green).
Let's go with the first one.
Cape
Cape is the most easy part. Consist of two rectangles, wich length is the size from the neck to the upper part of the boots, and width comes from the same point of the neck to the top of your fingers, putting your arms cross.
Then you have to sew it together only on the red line, a little bit more of the half.
Yoke and collar
This part consist in another four parts: back, front right side, front left side and collar.
Back:
I give you mi sizes as reference. It's based on a XL size from CosplaySky suit.
On the last image, the red line correspond to the seams need to be visible, about a 1" from the border.
Next, the front left side (from the wearer's point of view) consist in two pieces:
H.2 and H.3 need to be sew it together at the middle. H.3 will be on top of the front right piece. H.4 is the front right piece:
Now that's how it should look:
Grey part from H.4 will be hidden by H.3
Again, visible seams are required. Red are 1" from the border, blue are 1/2":
Bib
So sorry if 'bib' it's not the correct name for this piece.
The bib is quite simple to make. It consists of four sections, namely: two symmetrical sections, one inch wide, which will go on each side of the bib. A four-inch section on the left side, seen from the front, which will contain the pocket for the dosimeters, and finally a fourth central section.
The two outer sections will go down to the edge of our suit jacket, while the other two inner sections will be two inches longer. Remember, once again, to leave seam allowances when cutting the fabric.
The pocket in my case I made it four inches deep, enough to contain the dosimeters (at least the ones I have, manufactured by Malakili). For this I simply cut that section with the calculated length, plus twice the depth of the pocket, that is, eight inches. In this way simply by folding we get the pocket.
The fourth and last section, the central one, is the simplest. Simply calculate the width to fill in the full width of the shoulder / neck part.
And finally the visible seams. Across the bottom, seam to approximately a quarter of an inch to finish off the edge. Another quarter-inch seam in the center section over the pocket section. And most importantly, two cross seams in the pocket section. One inch horizontally from the edge of the pocket, and another vertically one inch to the left of the section. In this way we will "divide" the pocket in two, one of an inch almost useless and the other of three inches where the dosimeters will go. Earlier I said that this section will be four inches, although we now have a pocket really three inches wide. Keep in mind that a pocket less than two and a half inches wide we can have trouble putting two dosimeters.
Another measure that I have forgotten to comment on before, is that the pocket will be approximately two inches from the top edge.
And another thing to keep in mind when joining the three parts of the poncho, is that you have to form a "sandwich" in the following order from outside to inside: shoulders, cape and bib. I will leave some photos where I hope you can see well what I mean.