


KDKdesign
-
Posts
50 -
Joined
-
Last visited
-
Days Won
3
Content Type
Profiles
Forums
Gallery
Posts posted by KDKdesign
-
-
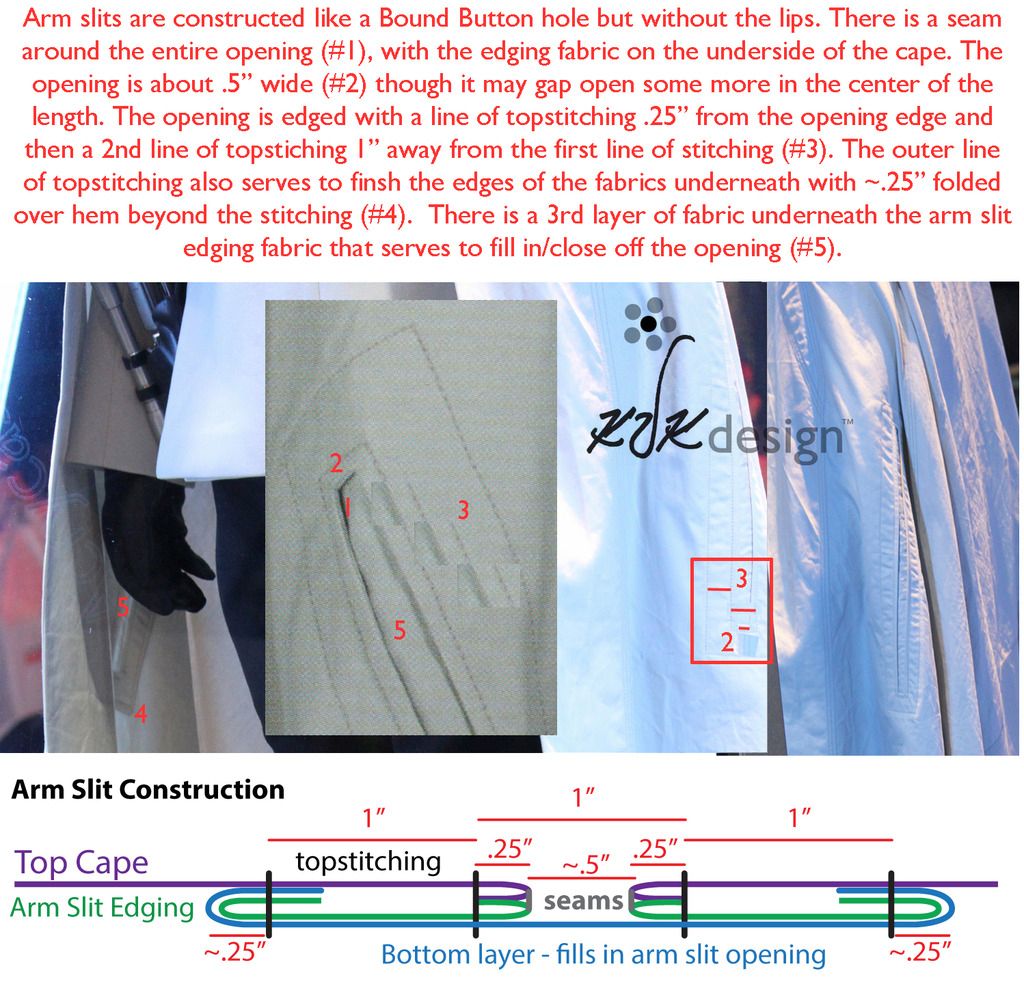
OK last one for tonight - I'll tackle diagramming all the other seams later, but here's how the Arm Slit openings are made. If you know how to make a bound buttonhole, it is very similar. And of course there's a layer of fabric underneath everything to fill in/close up the opening so you can't really put your arm through it (probably so it didn't gap open all the time). It's way, way past my bedtime - more later!
-
Next topic - Seams on Cape, part 1
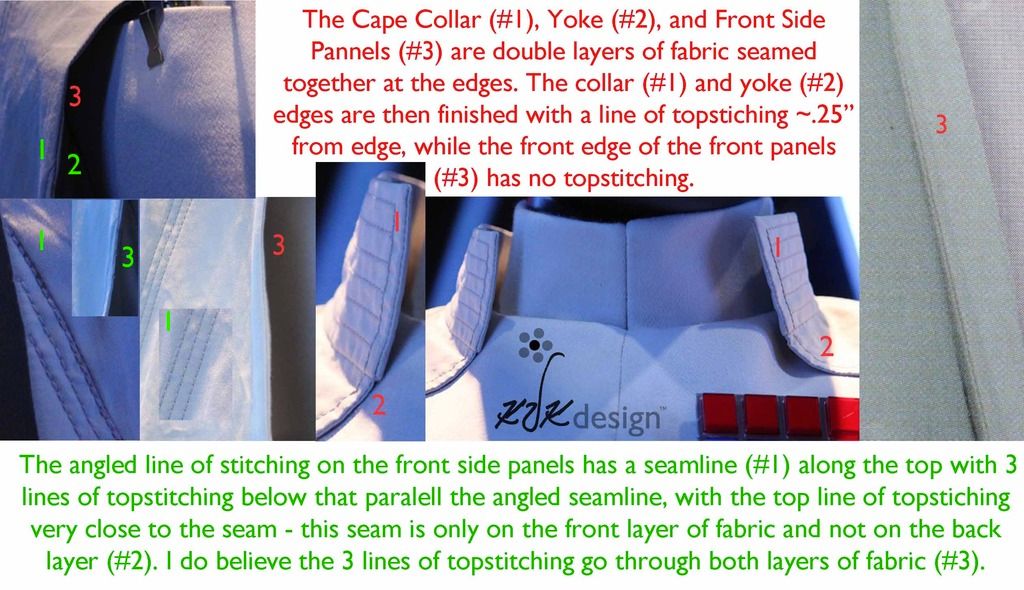
#1 - Basically the whole front edge of the cape: collar, yoke, and front side panel - are all 2 layers of fabrics with a seam on the edge. The Collar & yoke have a single line of topstitching .25" way from the edge, while the front side panel has no topstitching along the edge.
#2 - That angled stitching on the front panel - it has a seam along the top edge of the 3 lines of topstitching. I suspect this was an easy way for the costume makers to consistently mark on both sides where they wanted that those lines of stitching to go. But anyway - there's a seam there and then the 3 topstitching lines right below, the seam is only on the front layer of fabric, but I think the topstitching goes through both layers of fabric.
-
Hello! My name is Katie D Keith. I've been invited by Mark to work with Meg to figure out how to correct and improve the CRL for the Krennic Cape. I have not been active on the forum but I've been making 501st costumes for the last few years - Mark was my first costumer. I have a Associated Degree in Costume Construction from Indiana University (IU) and a MA in Apparel Design from Cornell. I taught Fashion Design Illustration at IU for 3.5 years before I had my son, who's is turning 3 this weekend. I actually found out I was pregnant the day after I met Mark for his first fitting. My son kept me quite busy for awhile, but now I'm finally getting a chance to spend more time working on costume commissions, and I'm known for making the First Order hats. So basically my background is strong in clothing construction knowledge, thorough research skills, and teaching through effective communication, both verbal and visual. I learned when teaching how important it was to clearly communicate my instructions to best achieve consistent understanding by my many students. I also have a very keen eye for details from my Master's research and all the grading I did as a professor. And what I'm also offering you is a fresh eye and perspective to this wonderful lot of photos that provide so much info about this costume as well as the images from the Rogue One Visual Guide. (I am also working on a Krennic costume for Mark so I've been researching it for awhile myself - and the cape is my next part)
Now onto my findings... first up, Cape Yoke & Collar
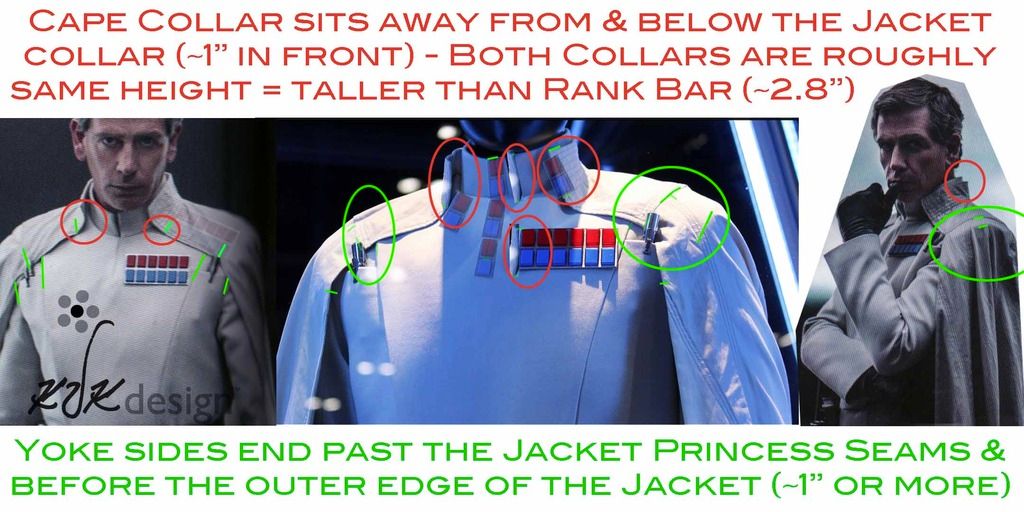
#1 Cape Yoke Length: I agree that we don't need specific measurements for the cape yoke on the CRL when landmarks or providing a range of measurements will do (I've had issues with specific measurements that were too big for the size I was making). But I did figure out why those yoke measurements were shorter than expected. It is because the Cape collar sits down away from the jacket collar, say about .5"-1", and the yoke side ends somewhere past the jacket princess seams but before the end of the jacket/sleeve seam, about 1" or more depending on how the cape is laying. You can see the how the cape portion goes out level with the yoke and then drops down over the edge of the jacket along the sleeve. But as pictured, this yoke is not meant to extend the full length from jacket collar to jacket sleeve seam. The front edge of the yoke starts about a 1" or less from the jacket collar and ends about 1" or more away from the jacket's edge, some where between the jacket princess seam and the sleeve seam.
#2: Cape & Jacket Collars: I like to use items in the photo that have known size and relate it to other parts of the costume - though i know it isn't perfect, it at least gives me a rough idea of proportions. Based on this, I think that both collars are roughly the same height - a bit longer than the height of the rank bar, so maybe ~2.8"-3", as I think the jacket collar does extend a bit more below the front jacket. The reason that the cape collar is lower than the jacket is because it is attached down away from the jacket collar, as explained in #1. The stitching lines on the cape collar are also a good indicator of overall height - I'd agree there about .25" apart so the collar again should be at least 2.75" - maybe almost 3".
Yay! Higher resolution version:

Krennic CRL
in New CRLs
Posted
I'm working on a full diagram on the cape front, back, top - but it is going to take some time and I think I need to drape my pattern of the cape to get a better idea of the part proportions/sizes. In the meantime - I'll post my research as I figure things out.
The line on the back side of the yoke - it is a single line of topstitching (not a seam) that goes from the collar straight to the stitching on the side panel's back seam - it probably even is a continuous line of stitching from yoke onto the cape seam.