


LogicOfficer
-
Posts
68 -
Joined
-
Last visited
Content Type
Profiles
Forums
Gallery
Posts posted by LogicOfficer
-
-
Looks like the General Veers armor, just a lower rank.
-
Logic Officer IC 21400
Dude in the front row of Scanning Crew.Also:
Aznjedi IC 42501
Asian dude in the middle of the group of Bridge Crew
Representatives of the Imperial Sands Garrison.
For the Empire!
-
I have changed the way the pics are posted, using Flickr.
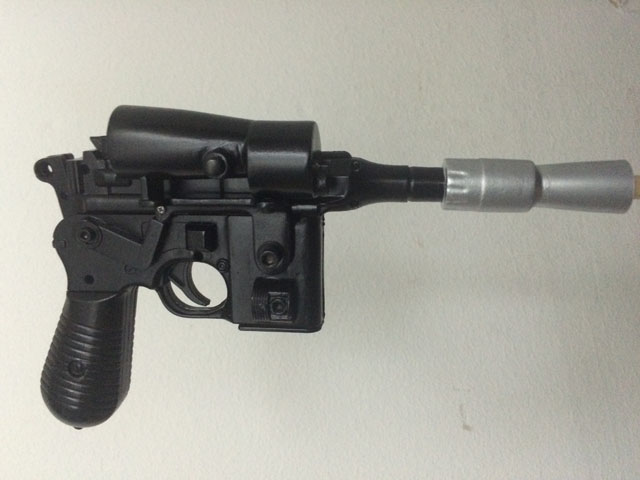
Here are a couple of pics of the nearly finished blaster, complete with some weathering. I still have to do the weathering of the flash suppressor.
 With weathering by hsmart, on Flickr
 Left side by hsmart, on Flickr
 Showing size by hsmart, on FlickrTop view showing the asymmetric placement of the heat sinks.
Finished product
Howard
-
While I await the arrival of my officer boots to complete my Staff Officer uniform, I am keeping busy by constructing a Merr Sonn Power 5 blaster.
I made a DL-44 for my TIE Reserve Pilot, and I am starting from the same plastic airsoft C96 Mauser replica:
This pistol is currently $21 USD on Ebay, so I bought two recently.
The challenge, of course, is to find or make correct greeblies to make the blaster come to life.
I started with the coil on top. It attaches to some sort of old camera flash connector. Probably no way of finding the actual item, so...
I chose a telephone handset cord, and attached an S-video connector to the front. Various pics of the screen-used props show 5-7 coils on top of the blaster. We cannot see exactly where the coil is attached in back, but it appears to dive down into the body just ahead of the hammer. This is what I will do once I am ready to attach it.
The next major identifying feature is the large heat sink, made of some plastic model aircraft cylinder parts. No originals on hand, so I looked for something similar. I have seen some posts her where people found plastic threaded plumbing parts. I was not immediately so lucky, but I found great looking brass threaded pieces that looked the right size.
 Brass Greeblies by hsmart, on Flickr
I could obviously not easily cut these in half, so I decided to make resin casts of the half-shape of each.
Here they are embedded half-way in clay, and boxed in to hold the poured silicone for the mold. I am also casting a disc greeblie.
 Embedded in clay by hsmart, on Flickr
Here is what the final molds look like
 Ready for resin pour by hsmart, on Flickr
And the parts being cast:
 New pieces in the raw by hsmart, on Flickr
Here they are after some clean up:
 Sizing pieces by hsmart, on Flickr
I decided after this to use a different part for the small end pieces.
The smaller diameter pieces will need to be shortened to the pen marks. Band saw then sanding station.
The small end pieces are model rocket nose cone rear caps, cut in half. I had to do longitudinal band-saw cuts in the back of all the pieces and dremel them out to fit over the ridge on the side of the gun. I epoxied them together in a straight line before finally attaching them to the blaster. There was some adjustment involved since the side surface of the gun has a few different levels.
I have couple of pieces for the "stun setting" buttons at the base of the magazine on the right side. They are rubber feet. The round pieces under the imperial disc greeblie are nylon washers.
I had to fill holes and remove lettering from the gun.
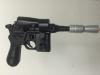
Without the barrel and flash hider it looks like a Merr Sonn Model 44.
 Right side by hsmart, on Flickr
I had wanted to leave the barrel detachable so that the blaster could be used as either model, but unfortunately I broke the short barrel during the build and had to use JB Weld to get it back together. It is a cheap plastic gun.
The flash hider on the DL-44 at the top of this post is made from two model rocket nose cones, one plastic and one balsa.
I did the same thing here. Easier the second time. This took some band sawing and hollowing out. I think the proportions came out nice.
 Shaping parts by hsmart, on Flickr
There is an issue with the heat sink on the left side. From what I can tell the original had a full size heat sink, but it was shifted backwards enough to accommodate the greeblie on the magazine. This makes it quite a bit asymmetric compared to the right side, but I think it is correct. I do not really want to leave part of it off just because the existing pictures on Parts of Star Wars show a broken prop.
Comments welcome.
Stay tuned for the final product.
Howard
IC 21400


Hat for Line Officers
in CRL Updates
Posted · Edited by LogicOfficer
I think the hat should remain a required part of the costume for approval.
I have to admit to doffing the hat under certain circumstances, like speaking at a conference. Here configured like Motti.