

kman
-
Posts
6,188 -
Joined
-
Last visited
-
Days Won
387
Content Type
Profiles
Forums
Gallery
Posts posted by kman
-
-
38 minutes ago, CarsonDyle said:
Thanks for your feedback. A member on FB suggested something similar. I purchased a yard of med/heavy canvas interfacing based on his recommendation. Now, I'm hoping to find someone with experience creating/ altering these types of caps to help implement the required fixes (unfortunately, I do not sew).
Any shop that does minor tailoring (most dry cleaners?) should be able to flip the hat inside out, remove the liner, add the interfacing, and put the liner back, pretty easily.
")
-
You'd need to remove the liner to do it right, but maybe some iron-on interfacing? That's a common approach to stiffening the jodphur flares, might work on the hat, too, and easily reversible.
-
On 6/14/2023 at 5:33 PM, SnazzyGent said:
Could anyone check out my gloves to see if they are appropriate length.
CRL states wrist length.
I think I am good, but just want to make sure.
Thanks.
You didn't specify which costume, but those look like the correct gloves for most of the non-saga costumes.
-
-
-
There have been a few threads about them here over the years. A search for "swagger sticks" should turn them up. I think CabbageFarmer sold his here at one point, but that was a long time ago. Mine is one of his, I believe, but I don't know if he still makes them.
Every one makes a different variation, since there's no true canon Imperial option for these (outside of the First Order guy, General Pryde).
-
On 6/10/2023 at 9:59 AM, TK41434 said:
The boots that are used in the movies/series are sometimes the German Knobelbecher boots.
Knobelbecher boots gained notoriety during World War II and were worn by German infantry.
<snip>
The German Jack boots are used by Bridge Crew and others, but not the Officers. None of that information is relevant to the question asked in this thread. The OP is looking for Officer boots, not Knobelbechers.
To answer the question:
Hessen boots are fantastic with a great price, but they have very limited sizes in stock right now. They do offer a custom option, but I've heard mixed reports on their ability to get the sizing correct... and reports of very bad customer service if they get it wrong.
CrowProps is a good option (for the money) for people who have unusually size feet (or legs), as they are full custom.
Next level up from there is probably Mux Leather... they're more expensive, but outstanding quality, and full custom.
-
5 hours ago, Ketchup said:
I need the caf cup! Having the major local con coming up in two weeks, and this will be perfect to stay hydrated. Need to find out where the strips to cover the logo come from…
Any local automotive shop will probably carry the auto trim, if you don't want to buy a whole bag from Amazon.
-
I have no doubt there are hundreds of skilled tailors in the world who could do as well or better than Clothears. But those are custom commissions from individuals, and they'll need to figure out and draft their own patterns, hope they get all the details right, etc.
For well-known companies that formally sell the uniforms, there is no better than Clothears.
And yes, it's an easy approval. As long as it fits you correctly and all the accessories are correct, beyond the sewn cloth parts.
-
On 6/11/2023 at 10:04 PM, TK41434 said:
Unfortunately the pebbled leather used in that first link (ASMC) isn't what we're looking for. The second link doesn't go to the boots you intended... I think you meant this: https://www.raeer.com/shopexd.asp?id=23934
Again, though, these recreations also appear to use pebbled leather, not the smooth leather used on the originals in the movies.
-
Gah! $100 is more than I'm willing to part with for one.
The cruises sound fun, but my wife gets seasick if she just looks at a boat (and believe me we've tried all the drugs), so such activities are not likely ever in my future...
I have friends who do a lot of Disney cruises, though... I may need to reach out to some of them. Meanwhile, if you take another cruise, let me know?
")
-
Hat box, and/or a foam mannequin head, so they don't get wrinkley?
-
On 5/26/2023 at 7:41 AM, crow62 said:
Giovanni here, we are using gabardine same used in the OT tie flightsuit now not twill as the beginning
I'd love to see some current photos!
-
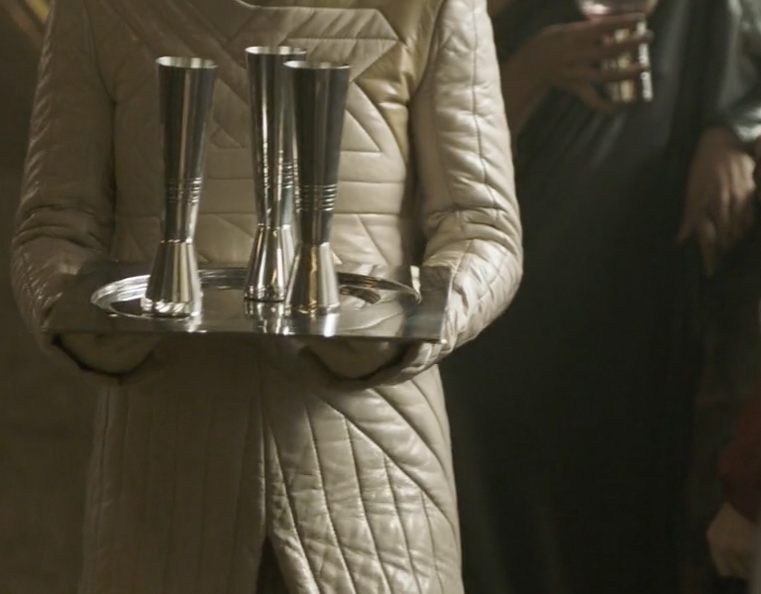
Those same goblets were all over Solo, as well, on Dryden Vos' yacht. I definitely want to get some of those! With the cruise wrapping up operations, I sure hope they sell them elsewhere. That said... they definitely should be silver. Still, beggars can't be choosers, so until there's another source...

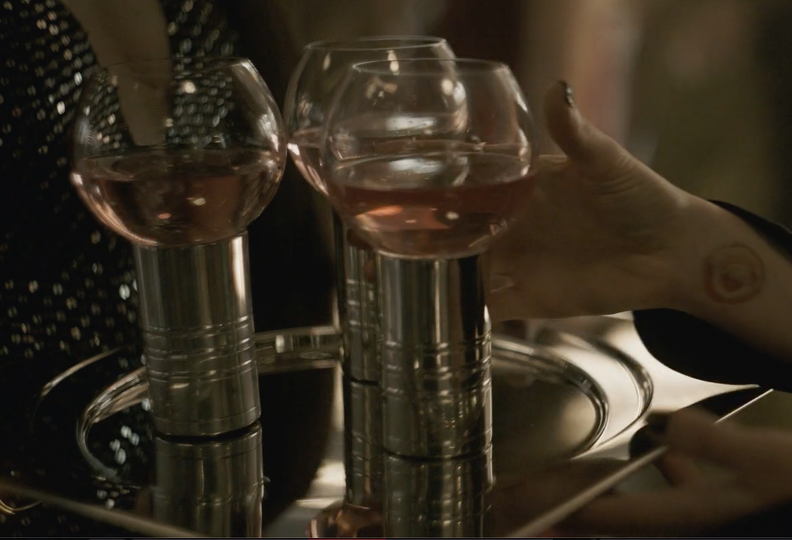
I'm also dying to get the taller champagne flutes they used, but have yet to find a good source for them, either.

-
There are very minor differences in the pattern used... subtle difference in the lines. But the basic construction between the two is identical, and the same uniform can be used for both OT and Non-Saga costumes, simply by changing the accessories. Buy two sets of accessories and you can have both costumes approved.
-
On 5/26/2023 at 6:37 PM, PiotrRasputin said:
Well, got the replacements. They are pretty much the same, as the ones I have already, just not stretched out.
Think I'm just going to return them since I already have a broken-in pair. I'll probably just invest in a boot stretcher to keep at home.
Do you mean they're the same size base (sole), and your stretched 12s are actually bigger??
If new 13s are the same size as your stretched 12s, that means you can stretch the 13s to get a larger boot. Yes, you'll need to break them in again, but in my experience they break in pretty quickly... the leather on Hessen boots is good quality and suffices for our needs 100% and then some, but it's not nearly as beefy as serious legit riding boots. (designed to defend your legs from getting hit by tree branches and such and offer actual meaningful protection like armor) Real riding boots are notorious for taking ages to break in properly.
-
Sounds good. Let us know how it works out for you!
-
It definitely looks "lighter" in that photo, but it's hard to tell the intent, and all colors on Aldani are incredibly suspect because of the intense color grading. I wish we had seen his poncho indoors under regular lighting. Take a look at those gloves, which we know are solid black leather and NOT gray, and realize there's not nearly as much difference as you would think, between the glove black and the poncho color.
All that said, I don't think the intent was to give "gray" ponchos to the green-suited officers and black ones to the black-suited officers. If anything, Lt. Gorn's may just be incredibly faded/weathered, compared to the newer ones seen on the Ferrix officers. (And recall just how long he had been stationed there, so that poncho could have been quite old, relatively speaking, and heavily used) This is especially true considering most denim twills and duck cloth tends to be heavy on the cotton content, and does not hold black dyes as true black for very long. (Take a look at every piece of black cotton you own that's been washed 50 times, and then bring it into harsh lighting conditions)
-
For slender people with feet that fit their limited size range, I'd generally recommend Hessen Antiques. https://hessenantique.com/riding-boots/
If you don't fit their limited sizing (and bear in mind the sizes run SMALL, not large, despite what the website claims), I would usually recommend CrowProps as the next cheapest option. They're full custom and there is a wait involved, however. https://crowprops.bigcartel.com/product/black-officer-boots-without-zipper
After that the price starts climbing. Imperial Boots pricing isn't terrible (though certainly higher), so that may be an option. Beyond that, yeah, higher (and slower). Mux Leather, Magnoli, actual custom riding boots... lots of options.
For my wife, I was super patient and just waited for the right size to show up on eBay, Etsy and local riding shops, and eventually scored a nice pair of legit riding boots for all of $75. Took about 9 months, though. You could get luckier. Or not.
-
Hessen used to have a custom option, which what you would need to get wide sizing from them. They don't stock wide sizes. I don't see it on their site anymore... could be it's buried there somewhere, or they just don't do them anymore.
I've definitely heard mixed reviews about Hessen's success percentiles, with regard to custom orders, and not great things about their customer service if they get it wrong. For those who get lucky, they're fantastic. For those who don't... well, I hope you have a reasonable amount of disposable income so it doesn't hurt too badly.
Personally, if I couldn't fit Hessen's off-the-shelf sizing, I'd probably look at CrowProps as the next cheapest option. https://crowprops.bigcartel.com/product/black-officer-boots-without-zipper
After that the price starts climbing. Imperial Boots pricing isn't terrible (though certainly higher), so that may be an option.
-
Wow, that looks *really* good, IMO.
A few small critisisms:
1) I think the color is a little too much on the gray side? I know Lt. Gorn's looked a lot more gray on Aldani, but those scenes were all color graded to hell and back, and it's hard to know how much to trust them. Of the two fabric's shown, I would lean towards the twill, since it seems like they use twill *everywhere* in the recent shows, but I couldn't swear to it.
2) The flap closure on the screen-used one has a rectangular detail that I'm not seeing... we suspect it's a magnetic closure, but it's hard to say with certainty. Diagonally, a little above the code cylinders, following the line towards the point? I don't object to the snap placement, even though I don't think that's there in the screen used one, since they're pretty much always supposed to be worn closed anyway... but they might want to add that rectangle even if it's non-functional.
3) Again I can't swear to this, but they might strongly consider making the inner-side code cylinder pocket a tad wider, so it can accomodate TWO code cylinder's. Again, I think it's the difference between Gorn's Aldani pattern, where Gorn only has one, and the Ferrix pattern where they cram two in there, so both are probably ok options.

4) On the first pic, it looks like there is some lighter fabric at the bottom front corners. Is that merely something else, hanging just behind the poncho, or actually part of it? Probably something behind it, but I can't be sure, so I wanted to make sure.
There's some really good reference shots in this thread:
Those small critiques aside, that looks like some pretty excellent work. Can you share the maker? I might actually consider picking up one of those, if the small tweaks can be made.
-
11 hours ago, Detaleader said:
Again, do we know for sure *all* boxes have been metal on R1? How do we know that cast or printed boxes haven't been around from the start of the anthology projects?
Stare at these boxes long enough and the difference is quite clear.
Many of the costumes have gone on tour and been photographed extensively.
Go ahead and watch the movie again and see if you can capture evidence to the contrary. I've done so... carefully... and not seen a single one that looked like it could be resin. The proof is there on screen. Please feel free to try again yourself... there aren't actually that many scenes with officers, and only a handful of officers even wear belt boxes. They're just not there, on screen. I just watched it again tonight, in 4K UHD, on a calibrated 85" screen, specifically looking for belt boxes the whole time, to be sure.
Now, to your point: Is there any way to SWEAR there isn't a single out-of-focus background character wearing a resin one? Of course not. And it's pretty darned hard to prove a negative, without talking directly to everyone in the prop department. But I'm pretty sure are you not going to be able to show us a screen shot showing positive evidence of resin boxes in Rogue One. If you have some from some other source, by all means please share it with us.
*Everything* we've gleaned to date has indicated metal for Rogue One, and I've seen nothing to the contrary, including in deleted scenes and material not released to the public. On the other hand, the new resin ones can be seen pretty readily, in some subsequent features.
But here's the main question, after all that: What would it matter, if you found some evidence that one random out of focus background character used a resin belt box? We've made it pretty clear that the plan is to allow both... We're not making a separate character CRL just for a belt box difference. We're just trying to figure out the best way to state it in the CRL.
-
58 minutes ago, Alay said:
Yes, but somewhere along the line someone saw it and decided it was the most important thing about it ever I guess haha
Also the thicker the gauge of metal, the bigger the gap between the two pieces (the "notched corner").
We're going way beyond the scope of this discussion or what should ever be in a CRL, but it's worth noting that they're indeed (at least partially) relief cuts. All metal bending has to have relief cuts to some extend, and bigger cuts for thicker metal, or it will tear, warp, or collide.
For example, here's an OT box I made. You can see that the ends don't quite touch each other, and in the corner the notched area is slightly larger than a 90 degree bend

and straight on

Here's how the seam looks in a CAD tool:
Point being, that can make the gap look more notchy, especially on smaller metal boxes this becomes more pronounced.
Understood. We're talking about different aspects of the same thing, though. I wasn't talking about the very corner bit, where there is a tiny relief cut to prevent corner puckering, I was talking about the actual edges of the metal, where you're literally looking at the thickness of the edges of the metal as it comes forward from the bend. That's the part that was made thicker when they 3D modeled it.
Had the box back been a solid piece of metal, and not had tabs folding forward, the metal would have needed relief cuts where the back "band" wraps around each corner, to replicate the look seen and generate those sharp edges, but that's not the case here, as the construction is different.
-
3 hours ago, Detaleader said:
So if I understand this correctly:
- Metal boxes have these cutouts simply by nature of the material
- Resin boxes have it to simulate the metal boxes
Therefore any box should have these, regardless of it being an Andor box or not, right? If that's the case, should we just specify it for any box, or leave out the specification at all?
So if you look at the construction of the metal non-saga belt boxes, what you're looking at is the edges of the folded metal "tabs" which are bent up to make a flat sheet of metal into a box.

Those aren't relief cuts, they're literally just the edges of the cut metal, coming together. (These obviously lack the pill detail, but that's not the point)
At some point after Rogue One, someone got tired of bending sheet metal into boxes and decided to 3D model the boxes instead, print them, and then cast them in metal-infused resin, so they could mass-produce lots of them, quickly, with little work. The metal content in the resin gives you an actual metal finish without resorting to terrible-looking paint, and yet can still have a mirror-smooth finish. That's what they use in Andor. (Some actually are painted, too, but they have both types) Close examination of a screen-used belt box showed clear evidence of 3D printing in some hidden areas, captured in the resin, making it clear how they were produced.
We're going to take a close look at the final language for how we want to phrase all of this should have something later this evening, we hope. (Might be tomorrow for some of y'all, as time zones are a thing)


Recommended way to straighten out Wampa Wear Costume
in Costume Questions - Ask Here!
Posted
They're polyester the thread used for the cavarly twill weave is REALLY fine... if you try to iron it yourself, be SUPER careful and use a very low setting, so you don't melt anything.
Personally, I stick with a steamer. You can get them extremely inexpensively on Amazon. I think the little travel steamer I use, which doesn't take up much space at home, was maybe $20? (although maybe a little more now, between time passing and inflation, but still quite affordable and super handy to have available)