That holster is simply a left hand version of the standard ANH-style MSP5 holster, but in black leather instead of brown. It's unusual to have a true left hand version, though... I almost wonder if that shot was mirrored? I'd have to look at the scene again.
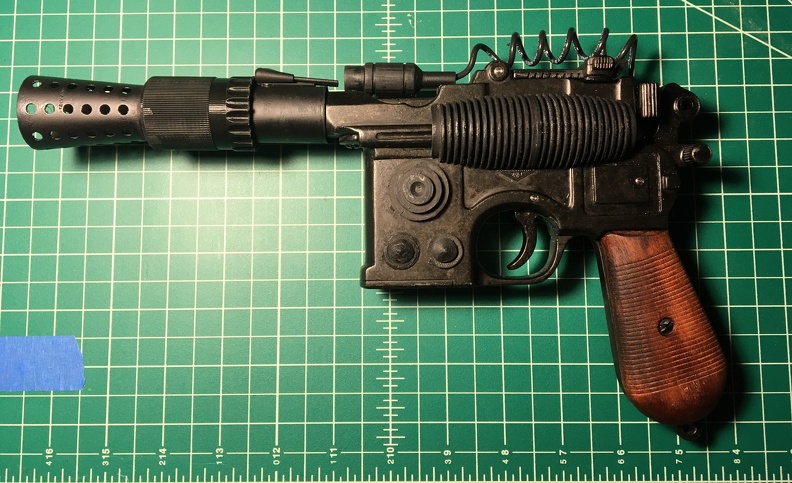
Yup, my normal trooping MSP5 was based on a cheap plastic Mauser that cost me like $15 and is based on the 712 layout. I recently converted it over from OG style to the new style... super easy, just silvered up the fins, swapped the cord, and painted the grips.
I agree on all points raised here I also agree that Airsoft as base shouldn't be something that needs to be explicitly mentioned.
The reason I guess I brought it up is that is something mentioned on the R1TK E-11, due to the visual differences. Stuff like a mag release button and selector can even be found on the cheapo plastic Aliexpress Mausers, Example photo:
Chances are that nowadays you're more likely to find 712 replicas than actual C96 replicas. Either way, 99% of people won't notice. And those who want to go RPF detailed still can do that.
Gorn is carrying an old school MSP5 with the coiled wire, and all black cooling fins. He has his own, and did not pick up Petigar's blaster. (His empty holster is visible in other shots from the scene with the second pic below, too, I just chose this one because it shows the blaster clearest)
Kinda makes sense, since he's been stuck on a backwater planet for so many years, while Meero and Petigar both hail from Coruscant, where presumably they would have access to the more current toys.
Interesting catch on the reddish greeblies on Gorn's blaster, but I do not see those colors carried over to Meero's, just some slightly lighter coloring with weathering. I don't think we've ever specified the color of the greeblies, though. If anything, could mention that "accurate greeblies are present on both sides."
Both Meero and Petigar carry the new (to us) model, with a straight wire across the top and cooling fins that have all silver metal edges. (the interior of the fins remains black, so it's not "all silver", just the edges of the fins are bare silver metal)
All other details seem to be the same, between the two types. Same top "scope" (mic jack), same tomtit antennas, etc. (The OG MSP5 greeblies came from Reade Models tomtit model airplane parts, also used on Han Solo's DL44 in places) My MSP5 has the original parts on the cooling fins, and the rest are 3D printed but modeled with the original parts in hand. I suspect their are not the original parts, but 3D printed, which give thicker fins to show the silver better.
All three are carrying them in the new style holster, however, very different style from ANH. (the only other place we've seen the MSP5 in live action) Gorn and Petigar wear them on the left, and Meero wore hers on the right. (outside her trench coat)
More good news: since the R1 and Andor Ponchos are pretty close (they are both black ponchos), both R1 and Andor Ponchos are permissible with either Security or Military officers. Previously we only saw Security officers with both R1 and Andor ponchos, and we only saw the military in black Andor ponchos. It simply makes sense to allow the R1 version since they already can wear a black poncho anyways. Close enough for plastic spacemen and great at world building.
I’ve been meaning to do one of these threads for a while now, and finally had a good excuse to make a new rank bar, so here goes.
Push button rank bars are the ideal. Screen-accurate, and just look way better than the cheap acrylic chip styles. And best of all, they can be hand made at home very inexpensively and with just a few basic tools! There are a LOT of photos here, detailing every step, but it’s a pretty straightforward process, as a whole.
There are also a LOT of steps here but don't be scared off... it's just because I broke each step to the nth degree, and a lot of steps are just double, triple, quadruple-checking measurement and alignment. This is all really simple stuff that nearly anyone should be able to do, and nothing more exotic than a hacksaw, sandpaper and an exacto knife (or something similar, even) is really required (plus glue, of course). And the hacksaw is probably optional, if you get the shop to do the first cut. Oh, and a ruler, of course.
HERE'S HOW:
Note: E6000 is the glue of choice. Know it, love it, use it. It takes 24 hours to cure, and I don’t recommend shorting that at ALL. BUT: I recommend starting the gluing either in the morning, so you can do some final manipulation in the evening, or in the evening, so you can do that final manipulation in the morning. (I usually just glue at night so I can tweak it in the morning, then let it finish curing through the day, and put it all together the next evening.)
Step one: The Buttons
Buy the appropriate push buttons for your costume.
TIP: See this thread for details on how and where they can be purchased:
Step two: The Bar
Buy a piece of aluminum stock. I prefer the 1/8” stuff, some people like the thinner 1/16” stuff. I just think the thinner stuff bends far too easily. You can get a long piece at Home Depot, Lowe’s, ACE, or really almost any hardware store. You can get 4’ of the stuff for around $10. That's quite a few rank bars, even if they're all the largest 6" size. So make some for a friend, or make yourself a variety so you can choose ranks like you pick socks for the day, LOL
Figure out how long it needs to be, based on how many buttons you’ll be using, and how far apart they are. Add the same spacing on each end, and I usually add a millimeter or two of extra length, because it’s easier to sand a little more off than to add more, if anything happens during the finishing process. Especially if the end cut is not perfect. Rogue One buttons, as pictured below, should be 3mm apart. The smaller OT buttons should be about 1/4" (~6mm) between them. See the Imperial Rank Bar databank page for details. (Note: That page needs updating with Rogue One/Solo info... it's being worked on) I'm using millimeters in this guide... I find them easier to work with for measuring very small distances like this, and most rulers have both measurements anyway.
I do this by literally just setting the buttons on the bar, starting from the end, and measuring out along a ruler. Very simple. Mark a line somewhere where you need to cut.
Step four: Cut the Aluminum
To cut the aluminum, I just use a hacksaw in a miter box. Aluminum is really soft and easy to cut, but if you don’t have a hacksaw, most hardware stores will do at least one cut on for you, so plan ahead and bring your measurements. (Be sure to pad the numbers because they’re not usually super precise about their cuts!)
Step five: Rough sand the bar
Sand the ends down to the exact size you want, within about a millimeter. I use my bench grinder for this, but it can be done by hand with just some sandpaper if you don’t have one. Rough sandpaper is fine at this stage (100-200 grit, whatever), because you’ll be cleaning it up with finer sandpaper in the next step.
Step six: Fine finishing of the bar
Next we clean it up, get rid of any visible scratches (common with plain bar stock from big box stores, since aluminum is soft and it gets beat up a lot), and generally make it nice. For this I use a high grit sandpaper, like 500 grit, and use one that’s rated for wet sanding, because it gives a much better final product very easily. You want a nice perfectly flat surface for this… I use the counter of the bathroom or kitchen sink, because it’s an easy place to do it. The aluminum powder sanded off can then be washed away quickly and easily, and the counter tends to be a perfectly flat surface. (perfect another for this, anyway… as long as you’re not talking aerospace parts, it’s fine) Just put a little dribble of water on the sandpaper and scrub back and forth until it’s clean and smooth. Clean up the ends, too, while you’re at it. I don’t spend much time on the back, since it’s never seen, but sometimes I’ll hit it a little if I feel inclined.
Some like to use a straight edge to sand along so the lines are perfectly horizontal, but it the final finish is smooth enough, that’s not something I care about. Here’s the final bar, for this badge:
Step seven: Measure
I’m a big fan of measuring, measuring, measuring, at multiple times throughout this process, because you really want this as perfect as possible. Shortcut that if you want, but don’t blame me if your badges are less than perfect. So I lay out the buttons, again, on the final bar, and double check everything lays the way I want, including the right amount sticking out on the sides.
Step eight: Button disassembly
Now we’re onto the buttons themselves. Remove the white inserts (just gently squeeze the legs and they should come right out).
Step nine: Button trimming
Next cut off those little legs. You can use any number of tools for this. I’ve used hot knives, utility / box knives Exacto knives, diagonal snips… currently my favorite method is the cutoff wheel on my Dremel:
Step ten: Button cleanup
Then I clean up the inside with the Exacto knife.
Cleaning up a lot doesn’t matter a whole lot, since its on the back and inside, but I’m a perfectionist that way. It does need to be perfectly cut away, though, so they lay perfectly flat. Extra plastic from the pins in the middle that make it rock back and forth is NOT what you want. Be careful not to take too much away… the covers clip in the middle indent, so that needs to be there, and you don’t want a big gap in the middle that lets the glue seep out, either. At the end, I take a couple of quick swipes on that wet sandpaper again… just a couple, though. You don’t want to remove much material here.
Step eleven: More measuring
Lay the inserts out on the bar again, and gently set the button covers on them so you can space them out and measure the distance again. BE CAREFUL NOT TO PRESS THE BUTTON COVERS ONTO THE INSERTS FROM HERE UNTIL THE VERY END!!! Without the legs, those inserts are a REAL b#$%* to remove.
Step twelve: Reference tape
Once everything is, again, laid out perfectly, use a strip of painters tape to carefully slide under the button covers (remember, they’re not pressed on, so they’re held a millimeter or two above the surface of the bar), flush against the inserts. This is going to be your alignment guide to make sure the inserts are perfectly positioned at the right height, so they’re nice and centered on the bar. (top to bottom)
Step thirteen: Double-check the line
Sanity check your tape alignment to make sure it’s nice and straight… it’s funny (not funny) how obvious a millimeter off looks, once everything is put together. The slant is a lot more obvious than you’d think. I tweaked the line just slightly after I took this photo, FWIW, since the left edge looks a hair lower than the right.
Step fourteen: Space out the buttons
Lay out the buttons covers out on their face AGAIN (upside down), on either a piece of paper, paper towel, or some other protective surface you don’t want glue on your nice dining room table, or even your workbench), carefully measured out, and with the inserts lightly placed inside. (REMINDER: BE CAREFUL NOT TO PRESS THEM INTO THE COVERS!)
Step fifteen: Use tape to hold the button insert underside
Now the interesting part begins. Tape a piece of painters tape (I like 1” for this)and gently lay it onto the undersides of the inserts. You should be able to lift the inserts out and have them stay in the exact position they were in when you flip it over. Measure them all AGAIN and confirm everything is as straight as it should be.
Step sixteen: Use tape to hold the button insert from the top
Take ANOTHER piece of painters tape and lay it over the TOP of those inserts. Again, this should lock them into place and hold them nice and firmly. Give yourself a good extra inch or so on either side, because later you’ll want to wrap the ends around the bar to hold things in place.
Step seventeen: Release the button insert underside
Flip it over and remove the tape from the bottom, and you have all the covers nice and in place, ready for gluing.
Step eighteen: Fill the inserts with Glue
And now we glue. Use E6000 or similar slow cure, self-leveling glue. Fill each insert entirely, but be careful not to OVER-fill them.
Step nineteen: Top off the glue levels
Double check they’re completely filled, and add a little more if any corners aren’t fully filled, etc.
Step twenty: Apply the bar
Now remember that bar stock with the tape along the edge? Put that tape line right up against the buttons covers filled with glue. You should feel it easily when the tape line touches the inserts.
Step twenty-one: Flip the inserts and bar
Flip it over so the glue will go down and glue the inserts onto the bar. Double-check your alignment against that alignment tape, now that you can see it easier. You should see pretty clearly that they’re all neatly pressed against the tape reference line, and you’ll know they’re just where they should be as a result.
Step twenty-two: Remove the alignment tape and package it up for the night
At this point, once I’m sure everything is where I want it, I fold the ends of the top painters tape under the bar, to hold everything exactly in place. Remove the alignment tape and wrap it round the middle, like a belt holding it all together.
Step twenty-three: Walk away...
Leave it all out to cure overnight. You’ll want probably 10-14 hours of cure time before the next step.
Step twenty-four: Double-check alignment and measurements
After about 10-14 hours have passed, the glue will be about perfect for the next step. Too long and it’s hard to move things around, if small adjustments are needed. Too short a time, and things can just move out of place again. 10-14 hours is the perfect level of tacky but no longer slippery.
Carefully remove all the tape, and gently place the button covers on the inserts again, so you can truly measure the final positions. (don’t lock them on, remember!) While you CAN measure just the inserts, I find the nice sharp edges of the button covers area easier to measure, and the sharp lines make it more clear if anything is off.
Step twenty-five: More measuring checks
Remove the button covers and AGAIN make sure everything is aligned perfectly, and the measurements between each are perfectly consistent. Again, a half millimeter will be visibly obvious once it’s all done, so this is your last chance to fix things. If anything is off, you should be able to carefully push the inserts around as needed. The glue will allow movements without screwing anything up, at this stage. Be sure to use a straightedge to make sure everything is *perfectly* straight.
Step twenty-six: Glue cleanup
If any glue seeped out from under the inserts, now is the perfect time to clean it up. The glue is still soft enough to be easy to remove with an exacto knife, and not cured hard yet, but not so soft that it just squishes around under the blade. Be careful not to move anything around while you do this, but it should be fairly set in place, as long as you work gently. Cutting right along the edge of the inserts will scratch the bar, but not in a visible area, since the button covers will go over this area.
Step twenty-seven: Walk away again...
Now leave it somewhere safe and walk away for another 10-14 hours. The glue will cure more fully during this time, but it’s no longer so slippery that it’s likely to move out of place on it’s own.
Step twenty-eight: Attach the button covers
After a full 24 hours from the initial gluing has passed, all your work pays off. Visually look it over one last time, measure AGAIN if you want, and then you can proceed to snap the button covers fully onto the inserts, and enjoy your beautiful new rank bar.
Step twenty-nine: Apply the backing
The timing of the very last step is up to you. The glue SHOULD be pretty set at this point, but I still like to be careful (there’s a lot of glue in an enclosed space, in there). E6000 fully cures in 72 hours, so that’s my preferred time to proceed, but it really depends on how much of a hurry you’re in. I’ve done the last step sooner and been fine, just try to be gentle with the buttons a bit longer, and don’t leave them anywhere where anything is pressing on them.
But the last step is to attach whatever attachment method you’re using to the back. I use simple self-adhesive magnet bars from Amazon (see the DIY push button source thread linked at the top of this post). Just peel off the sticker backing and stick on the back of the rank bar, and you’re done. (I put something moderately heavy on top for a couple minutes to really stick the sucker on there) Some prefer push pins, which would need to be epoxied into place, but that’s all up to the end user)
Step thirty: There is no step thirty
Et fini. You're done. Stick on your costume and rock that rank!
If my opinion is worth anything, Justin and Kalani are spot on with this. Please do not support RubberBlastersEtc on Etsy, Facebook, or any other platform. AVOID AT ALL COSTS.
Hey all, please be aware that the vendor RubberBlastersEtc should be avoided at all costs. They have been removed from every Legion forum and the proprietor banned from the Clubs due to confirmed previous conviction of the most severe type of criminal charges. Please DO NOT support this individual or recommend/link their page, and always research and check your Detachment/relevant forums for lists of vetted vendors and those to avoid BEFORE making any significant purchases. This is the former proprietor of Hyperfirm (yes, THAT ONE), so due to the sensitive nature of the topic, I am not inviting discussion but you can PM me if you have pressing concerns.
My goal is for the only thing to show up when people Google or search any 501st forum is a post clearly stating not to support this individual. It is potentially damaging to the IOC and Legion in general when members leave reviews citing their membership and support, and members should be strongly deterred to avoid the perception that the Legion in any way approves of or is affiliated with this vendor. Thank you.
So I got a standee.... So I can see detail at full size. Very illuminating what details I missed. I sent closeups to one the 3d modelers to ensure a closer detail as he works on the new parts.
It shows some vambrace detail, foot cover detail that was pretty hard to see.
I also have a printed and painted chest plate. So that's neat.
So I'll wait for some updated moff files, through out my orignal knees (or give them to a mando in need)
Found someone to help with casting the ab section, probably using smooth on. So. Many. Steps.
Right, we can't say that a DN uniform is guaranteed to be approved, because it has to *fit* the costumer correctly. Off the rack sizing may or may not fit well. You can often tailor it, however, so as long as that is done correctly, there should be no issues with the costume based on meeting the 501st's requirements (and definitely no problem with the color). Feel free to quote us on that, and have your GML ask us for feedback in the GML forums on the 501st site. (That said, if the costume doesn't fit YOU correctly, the fact that it has accurate construction and color may not matter)
Denix is a great base and produces a wonderful looking blaster.
Just be warned about the weight. Those suckers are HEAVY and really pull down the belt. Even with added industrial velcro, the weight got to be annoying enough that I switched to the plastic one, even though it's not as pretty. If I was doing a photoshoot, I'd likely bring out the Denix-based one. But for routine troops (and especially all day at a Con), lightweight wins every time. And realistically, outside of a photo or two, my MSP5 stays holstered the vast majority of the time anyway. We are not Stormtroopers, walking around the with blasters in our hands at all times.
On my to-do list is to try to replace the plastic handles with wood ones, on my plastic MSP5. Holstered, you really can't tell the difference between the two, except for those handles.
Well since I have the Andor Tumbler, I decided to try my hand on finding bits for the ANH death star cup, managed to find the Tupperware Jellete bottoms easy enough on ebay, vendor just around the corner from me had 4 complete sets so saved on postage.
Top half will be a bit harder since no one on the RPF has found the original part used... might see about vintage aluminium cups or Thermos lids.
That said, I'm going to stick with ordering from OpenTip. Seems a better likelihood of getting the correct trim, plus I can't bring myself to order from the Amazon seller.


 kman got a reaction from TK1571 in ISB Non Saga/ Imperial Military Officer Power 5 Updates
 kman reacted to Detaleader in ISB Non Saga/ Imperial Military Officer Power 5 Updates
 kman got a reaction from chicken45 in ISB Non Saga/ Imperial Military Officer Power 5 Updates
 kman got a reaction from MrX4353 in Push button Rank Bars: How to Make Them!
.thumb.jpg.5b44a38ebafe8e37ea3da2a9981fe7d3.jpg) kman got a reaction from TheRascalKing in RubberBlastersEtc - AVOID THIS VENDOR
kman got a reaction from TheRascalKing in RubberBlastersEtc - AVOID THIS VENDOR kman got a reaction from TI28467 in Is the green / olive Imperial Officer costume from Denuo Novo is approved by the 501st legion?
 kman got a reaction from Amadeus98 in Star Wars: Visions - ISB Admiral
 kman got a reaction from Riviate in Andor style Merr-Sonn Power 5