Denix is a great base and produces a wonderful looking blaster.
Just be warned about the weight. Those suckers are HEAVY and really pull down the belt. Even with added industrial velcro, the weight got to be annoying enough that I switched to the plastic one, even though it's not as pretty. If I was doing a photoshoot, I'd likely bring out the Denix-based one. But for routine troops (and especially all day at a Con), lightweight wins every time. And realistically, outside of a photo or two, my MSP5 stays holstered the vast majority of the time anyway. We are not Stormtroopers, walking around the with blasters in our hands at all times.
On my to-do list is to try to replace the plastic handles with wood ones, on my plastic MSP5. Holstered, you really can't tell the difference between the two, except for those handles.
"Best" is subjective, but I've used a combo of models from gucabe and seankfields in the past, and been happy with the results. I don't usually print the main blaster, however... that's a huge PITA and always somehow lacking, IMO. I like hacking up cheap plastic airsoft mausers. They're plentiful, inexpensive, and have moulded plastic far superior to what you get with 3D printing, and save a ton of work. Then just 3D print the add-on bits. (much like the original prop guys added on various bits to existing pistols)
This thread of mine is old, but might have some useful ideas for you (it covers using both the Denix and the plastic mausers):
Just wondering if anybody would be interested in purchasing screen-accurate Imperial scanning crew/bridge crew/officer headsets?
They will be made from metal components, with accurate boom mic tip and leather headpad. The headset is a costume prop and otherwise-non functional. A short lead with a 3.5mm jack is included, but is a dummy, and designed to be long enough to tuck into costume. The headset is the result of a lot of research and observation of the original props and their components.
If anyone is interested, I plan on producing short runs to order, and measured to your head and cap size. There will be two versions- the 'Crewman' design with aluminium spun earpieces, and silver mic tip, and the 'Veers' design with semigloss black earpieces and black mic tip. The cost will be £40 per headset, excluding delivery.
This thread will be where we work on developing the language for the CRL for this new-to-the-Legion costume, trailblazed by @whitmers. Here is his WIP thread:
This placeholder thread will start work on the language to be submitted to the Legion for the CRL and this initial post will be updated and revised as decisions are made and we narrow in on final wording.
Moff Gideon CRL
Description: Moff Gideon
Prefix: ID
Detachment: Imperial Officer Corps
Context: The Mandalorian, Season 1
Moff Gideon served as an officer in the Imperial Security Bureau of the Galactic Empire and participated in the Great Purge of the Mandalorians during the Imperial Era. In the aftermath of the fall of Mandalore, Gideon came into possession of the Darksaber, and has been pursuing the capture and study of the alien creature Grogu, as a means to further his ambitions as a leader of a remnant of the Empire. He is imposing and ruthless, willing to kill fellow Imperials to achieve his goals, as shown by his non-hesitation in killing over a dozen stormtroopers when he first arrived on Nevarro and killing an officer for interrupting him. He is an adept tactician and skilled at both psychological warfare and personal combat.
Hair and facial appearance
Hair is natural, short and well-groomed
Costumer is clean-shaven
A thin, neat mustache, may be present
Level 2: A thin, neat mustache, natural in appearance, is present
Hair matches very closely to that of Gian Carlo Esposito in The Mandalorian, S1.
Tunic
Tunic is made of black suiting material, gabardine or twill weave is most appropriate
A mandarin-style collar is present
Tunic and collar both fasten at the rear
Sleeves are long, and without decoration, cuffs or buttons
A single outer seam exists with red piping extending from shoulder to cuff
There are two vertical seams intersecting the front of the tunic from the top of the shoulders to the waist
At the waist there is a seam running the entire circumference of the tunic
From the waist down the fabric is quilted around the waist
Level with the left and right vertical seams, the quilted section is divided into panels approximately 1.5 inches wide
A leather or leather-like trim runs vertically down the leading edge of the costumer’s right quilted section, around the entire lower edge of the tunic and back up the right hip
Tunic is constructed with no top-stitching (no stitching to to be visible on the exterior surface of fabric)
Cloak
Cloak is black and extends down from the shoulders to approximately just above ankle height
Cloak is made from heavier coat-weight fabric with a slight nap; melton is most appropriate
The cloak is attached via hidden means
Top edge of cloak follows along the top of the shoulder lines and the base of the neck
Cut with an oval-shaped hem, not a straight edge parallel to the ground: The back center is noticeably lower to the ground than the front edges.
A red lining is present and is not sewn in at the bottom
Trim is present which extends approximately 1” on the outside leading edge, and 1.5 to 2 inches along the inside leading edge of the cloak, including both sides and the top edge over the back of the shoulders
Trim is grey, or black when a suitable patterned overlay is applied which gives the trim the appearance of grey
If an overlay is applied it will be a white/grey hexagonal outline pattern
Red piping intersects the trim and the main bulk of cloak
The red piping color matches that used on the tunic and jodphurs
Level 2: The trim is black with a white/grey hexagonal overlay applied, giving the trim the appearance of grey
Five to Six evenly spaced pleats are present, centered at the back of the neck, where the cape fabric meets the trim
Jodphur Trousers
Jodhpurs are made of a black suiting material matching the tunic
A black leather or leather like panel is present on the inside of each leg
Lower edge of panel begins inside the area covered by the boots, or extends to the leg openings
Red piping matching the tunic sleeves extends from the hip to under the boot on the outside edge of the each leg
Level 2: Panel tapers to a rounded point from the lower leg, where half the leg is covered, upwards to end approximately midway up the inner thigh
Cummerbund / Sash
Cummerbund is worn around the waist and is made of soft black leather (or similar in appearance to leather) and matching that of the gauntlet cuffs
Nine semi-rigid ribs matching that of the cuffs are present
Ribs are a series of fourteen nested right angles beginning at the center and branching off to the left and right, with the first rib connecting to create an inverted ‘T’ shape as the 15th vertical
The nested right angles are repeated on the back of the cummerbund
Red piping is present along the upper and lower edges of the cummerbund, matching the red piping of the tunic, jodphurs and cloak
A silver medallion measuring approximately 1.5” across, matching the reference images, is affixed centrally to the front of the cummerbund
Medallion consists of a raised center circle in the center with a raised edging
Two small circular holes are on either side laterally of the raised center
Level 2: Medallion will have slight weathering.
Armor
Note : All references of Right & Left are from the viewer’s point-of-view.
Armor consists of the chest and optional back piece; armor and greeblies details match visual references.
Accurate shape/design to front of chest.
The sides of the chestplate are gloss black. The armor curves around the sides.
The chestplate has a satin black inverted trapezoid-shaped top panel (separate or attached) at the center top portion of the glossy black main chest armor.
The top panel terminates at the center of the chest armor, with an additional thin trapezoidal inset.
The top panel of the chest plate contains two identical depressions at the top center.
At the front center, below the top panel, a satin black center inset panel is moulded in, which includes these details:
Two recessed circular buttons are present on the upper left corner of the section, with red on the left and white on the right.
In the bottom right of the inset panel there is an additional inset portion, which holds two grey rectangular pieces, flanking a slightly longer and wider white rectangular piece.
Tie-Pilot styled ribbed shoulder bridges connect the Chest Armor and Back armor (if present), disappearing under the cape.
Attached to the straps is a flat black rectangular greeblie with slightly curved sides. It is about ¼ inch (.6mm) wider than the strap on either side and about 3 ¾ inches (9.5cm) by 2 ¼ inches (5.7cm) long.
The rectangular strap greeblie has 4 rectangular moulded buttons, each 1 inch by ⅝ inch (2.5cm by 1.6 cm). The center buttons are red. The top and bottom buttons are black. On the inside portion towards the neck is a rectangular detail with a center depression.
There is a detailed bracket where the chest armor connects with the shoulder straps, which has a central circle with a raised circular section on 2 prongs.
There are two oval holes near the front edges with a circular hole central between them.
The strap greeblies connect to the chest plate at brackets
There is a detailed rectangular greeblie on top of the shoulder strap.
There are 4 rectangles, each 1 inch by ⅝ inch (2.5cm by 1.6 cm). The center 2 are red. The top and bottom 2 are black.
On the inside portion towards the neck is a gear with 3 sections with a depression.
If optional Back Armor is present it shall give the impression of armor worn under the cloak.
Any Back armor shall be fully concealed by the cloak
Any Back armor shall not be exessively bulky
Level 2: The red and white circles on the center inset panel are illuminated.
Shoulder Armor
Two gloss-black rigid shoulder armour plates are present
Shoulder plates match visual reference
The shoulder plates have a raised rim around the edges
Shoulder plates are not identical
The right shoulder plate has additional raised detail not present on the left plate.
Gloves
Gloves are fingerless and made of a tight black mesh-like fabric
Rigid material plating covers the back of the hand and extends past the first knuckle of each finger with no plating on the thumb
Plating closely resembles the reference images
Raised ridges cover each first knuckle
Separate plates with a rectangular slot are present on each finger
Gauntlet cuffs extend past the wrist to approximately halfway along the forearm
Gauntlet cuffs are made of semi-rigid, ribbed material of soft black leather (or similar in appearance to leather) and matching that of the cummerbund
Ribs are a series of nested right angles beginning at the top of the forearm and branching off to each side of the wrist, with the first rib connecting to create a ‘T’ shape
Matching black piping is present at the end of the cuffs
Level 2: Valken / Matrix or Tippman Half Finger Tactical gloves of a matching model, or an exact copy, are used as a base
Comlinks
Rectangular, slightly curved commlink cuffs cover the wrist strap of each glove, with details matching the reference image
Both commlinks are identical with the exception that the left features a Blue central raised circle, while the right is rotated 180° and features a Red central raised circle
Comlinks are secured with a webbing strap at the wrist
Boots
Boots are knee-high and made from black leather or leather-like material
Boots are not tightly fitted to the calf
Heels are approximately 1.5 inches (~3.81cm) in height
Straps and boot detailing closely resemble the reference images
There is an internal central tongue panel which raises from behind the first strap to the top of each boot behind two flanking panels
Two slightly shorter panels close over the central panel and have a gap of approximately 0.5-1 inch (~2.54 cm) revealing the central panel
There are thick straps which connect the side panels across the top of the center tongue panel
Straps are approximately 1” thick and are evenly spaced starting approximately half an inch (~1.27 cm) from the top of the flanking panels and ending on the top of the foot
Level 2: Boots zip up on the inner part of the boot shaft
Optional Accessories
Belt
If a belt is worn, it is approximate 1.25" wide, made of black leather or leather like material, and worn underneath the cummerbund.
Belt is not visible unless holster is present.
Level 2: Belt is present.
Blaster
Scratch built or high-end prop replica based on a Walther P38
If a blaster is present, the holster is required
Level 2: Grips are smooth
Holster
Holster is black in color and made of leather or a leather-like material
Wet-formed/shaped to that of the blaster
A retaining strap approximately 0.5 inches (1.27cm) in width is present
Strap features a silver snap to secure weapon
Lower edge of the holster should extend to approximately the middle of the costumer’s thigh in a Drop Holster configuration.
Holster hangs from the belt which is pulled down slightly from under the cummerbund
Dark Saber
The Dark Saber should be a scratch made, or high end replica, in the Mandalorian style (oval), not the Clone Wars style (rectangular)
Dark saber body should be approximately 11” long and based in a gloss black finish
The cross section shall be oval in shape
There are 4 vents on each side near the emitter
There are 8 raised rings at the bottom
Should have 2 raised rectangles on the hilt similar in pattern to the cummerbund
Emitter should have an angle and should have an up-swept guard towards emitter
Level 2: The Dark Saber should be capable of being belt worn with the emitter facing upwards (detachable blade or no blade)
Should be a 1:1 scale of the Saber used in the show
Level 3: The Dark Saber raised detail on the hilt is rubberized
SCREEN REFERENCES: https://imgur.com/a/ZV6AlJy
TOY REFERENCES: https://imgur.com/a/uvwTwwI
STILL TO DO:
- Clean up Imperial / Metric measurement conversions (Note: This will be done directly with the LMOs as the final text is worked out with them)
Yeah I totally agree with that. It is nice to have the option to wear a blaster. The same story applies to the Netherlands where blasters are prohibited at many events as well. It is cool that you can be armed at photo shootings as a line officer now. The options and details that the Mandalorian is showing us as officers is awesome. And you are right, the costumes don't look incomplete when leaving the blaster out so it is nice to have an option that works in all situations.
Belt on backwards hurt me though. Any real world military if you put your ribbons on the wrong side or sewed a patch on the wrong arm, I think you'd get one heck of a chewing out. Belt upside down when you Captain a ship? Tsk! :p
Upon rewatch, I think you're right. They definitely have a brighter backing material (or are color corrected in post-processing, more likely) than the OT badges did. They're very spaced compared to their OT counterparts (and way more spacing than rogue one/solo ever had).
For some reason I can't screenshot disney plus on my PC... screen goes black, or I'd post some identifying shots.
---
Actually I take it back. I think the metal backing might be bigger and they're still Rogue One sized...
Doing well, so far. Still at my workplace ( warehouseman ) as the job I'm at has not yet closed down completely, so no home quarantine for my part, yet.
Still alot of the office staff is working from home with only a few brave souls coming in a few days a week. Orders need to be delivered in and out, after all.
Taking it day by day and follows each development.
Some of you may know, but many likely do not, but I just got married this summer. And, as both of us were huge Star Wars fans, we had... lets say, a themed wedding. It was really great. I dressed up as my Grand Admiral, my best man and all my groomsmen were Officers. Even the bridesmaids wore rank bars, and Krennic (who is also our friend) did the ceremony. We also invited my Garrison to come out and walk down the aisle with us. It was spectacular, and I thought some of you would like to see the pictures. All photo credits go to JRush Photography.
We even had a Star Wars cake!! And it was delicious!!
Some photos that we took over one of the weekend and we wanted to have some fun shots! and I used the Disneyland rank bar that they had. I pretty happy that the size looks pretty good.
As we wanted to do one photo on wearing a dress or a skirt with our officer outfit. So early on I did a inspired imperial Officer dress with a high slit after I saw the Solo movie on the officers socializing at the crimson dawn party. So just wanted to have a inspired dress for female imperial Officer.


 Riviate reacted to Jeanette in Andor ISB Datapad
 Riviate got a reaction from kman in Andor style Merr-Sonn Power 5
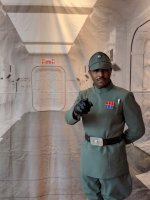
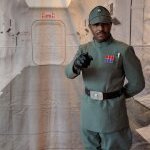
 Riviate got a reaction from SabreTaser in Officer poses
 Riviate got a reaction from ocmano in Officer poses
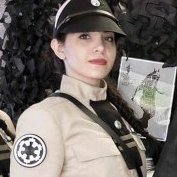 Riviate got a reaction from GiuliaEclipse95 in So you wanna be on Facebook? How about Twitter?
 Riviate got a reaction from Cosmic in *Mandalorian Chapter 11 SPOILERS*
 Riviate got a reaction from Steven in *Mandalorian Chapter 11 SPOILERS*
 Riviate got a reaction from trencher in How's everyone holding up thru the Pandemic?
 Riviate got a reaction from Peppe in How's everyone holding up thru the Pandemic?
 Riviate got a reaction from doc1863 in How's everyone holding up thru the Pandemic?