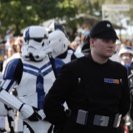
Starting this thread for the discussion of the Non Saga Imperial Officer Uniform. The Detachment used to call this "line" officers for the original trilogy, we will no longer use fan created names when naming costumes going forward.
A few guiding principles for this costume and thread (these are not binding but they will be discussed):
It will contain details and options that we see from the year 2015 on. The Original Trilogy Line Officer will be not be touched in anyway unless some special information comes to light from those films.
It will incorporate options that we have seen on screen from the new Non Saga anthology movies, television shows and other licensed material (straight pants and Chelsea boots versus, breeches and boots, optional white shirt and hatless officers).
The construction will follow how the costumes are made for these productions (Modesty tabs will be optional but recommended, expansion joints in boots as seen on screen, etc)
Accessories if seen used in licensed LFL material will be added to the CRL. in many cases, the accessories are already existing in other CRLs and can be quickly added when verified.
Permission for face characters to be allowed will be secured at level one, provided licensed LFL material can be referenced.
How we will do things is up for debate. What is not for debate is finding a way for members to be able to create the licensed LFL characters they have seen in media. We will find a way and I think this is the best platform to do so while preserving what has come before and we do not want undone. This is the core costume for going forward. Having this move forward will give us the agility to respond when we see them used in future Disney LFL productions.
We will be soliciting models from the membership. A number already have uniforms mostly assembled or ready to go. We expect at least two variants for the uniform with different potential face characters to be displayed. If you would like to participate, let us know.
I’ve been meaning to do one of these threads for a while now, and finally had a good excuse to make a new rank bar, so here goes.
Push button rank bars are the ideal. Screen-accurate, and just look way better than the cheap acrylic chip styles. And best of all, they can be hand made at home very inexpensively and with just a few basic tools! There are a LOT of photos here, detailing every step, but it’s a pretty straightforward process, as a whole.
There are also a LOT of steps here but don't be scared off... it's just because I broke each step to the nth degree, and a lot of steps are just double, triple, quadruple-checking measurement and alignment. This is all really simple stuff that nearly anyone should be able to do, and nothing more exotic than a hacksaw, sandpaper and an exacto knife (or something similar, even) is really required (plus glue, of course). And the hacksaw is probably optional, if you get the shop to do the first cut. Oh, and a ruler, of course.
HERE'S HOW:
Note: E6000 is the glue of choice. Know it, love it, use it. It takes 24 hours to cure, and I don’t recommend shorting that at ALL. BUT: I recommend starting the gluing either in the morning, so you can do some final manipulation in the evening, or in the evening, so you can do that final manipulation in the morning. (I usually just glue at night so I can tweak it in the morning, then let it finish curing through the day, and put it all together the next evening.)
Step one: The Buttons
Buy the appropriate push buttons for your costume.
TIP: See this thread for details on how and where they can be purchased:
Step two: The Bar
Buy a piece of aluminum stock. I prefer the 1/8” stuff, some people like the thinner 1/16” stuff. I just think the thinner stuff bends far too easily. You can get a long piece at Home Depot, Lowe’s, ACE, or really almost any hardware store. You can get 4’ of the stuff for around $10. That's quite a few rank bars, even if they're all the largest 6" size. So make some for a friend, or make yourself a variety so you can choose ranks like you pick socks for the day, LOL
Figure out how long it needs to be, based on how many buttons you’ll be using, and how far apart they are. Add the same spacing on each end, and I usually add a millimeter or two of extra length, because it’s easier to sand a little more off than to add more, if anything happens during the finishing process. Especially if the end cut is not perfect. Rogue One buttons, as pictured below, should be 3mm apart. The smaller OT buttons should be about 1/4" (~6mm) between them. See the Imperial Rank Bar databank page for details. (Note: That page needs updating with Rogue One/Solo info... it's being worked on) I'm using millimeters in this guide... I find them easier to work with for measuring very small distances like this, and most rulers have both measurements anyway.
I do this by literally just setting the buttons on the bar, starting from the end, and measuring out along a ruler. Very simple. Mark a line somewhere where you need to cut.
Step four: Cut the Aluminum
To cut the aluminum, I just use a hacksaw in a miter box. Aluminum is really soft and easy to cut, but if you don’t have a hacksaw, most hardware stores will do at least one cut on for you, so plan ahead and bring your measurements. (Be sure to pad the numbers because they’re not usually super precise about their cuts!)
Step five: Rough sand the bar
Sand the ends down to the exact size you want, within about a millimeter. I use my bench grinder for this, but it can be done by hand with just some sandpaper if you don’t have one. Rough sandpaper is fine at this stage (100-200 grit, whatever), because you’ll be cleaning it up with finer sandpaper in the next step.
Step six: Fine finishing of the bar
Next we clean it up, get rid of any visible scratches (common with plain bar stock from big box stores, since aluminum is soft and it gets beat up a lot), and generally make it nice. For this I use a high grit sandpaper, like 500 grit, and use one that’s rated for wet sanding, because it gives a much better final product very easily. You want a nice perfectly flat surface for this… I use the counter of the bathroom or kitchen sink, because it’s an easy place to do it. The aluminum powder sanded off can then be washed away quickly and easily, and the counter tends to be a perfectly flat surface. (perfect another for this, anyway… as long as you’re not talking aerospace parts, it’s fine) Just put a little dribble of water on the sandpaper and scrub back and forth until it’s clean and smooth. Clean up the ends, too, while you’re at it. I don’t spend much time on the back, since it’s never seen, but sometimes I’ll hit it a little if I feel inclined.
Some like to use a straight edge to sand along so the lines are perfectly horizontal, but it the final finish is smooth enough, that’s not something I care about. Here’s the final bar, for this badge:
Step seven: Measure
I’m a big fan of measuring, measuring, measuring, at multiple times throughout this process, because you really want this as perfect as possible. Shortcut that if you want, but don’t blame me if your badges are less than perfect. So I lay out the buttons, again, on the final bar, and double check everything lays the way I want, including the right amount sticking out on the sides.
Step eight: Button disassembly
Now we’re onto the buttons themselves. Remove the white inserts (just gently squeeze the legs and they should come right out).
Step nine: Button trimming
Next cut off those little legs. You can use any number of tools for this. I’ve used hot knives, utility / box knives Exacto knives, diagonal snips… currently my favorite method is the cutoff wheel on my Dremel:
Step ten: Button cleanup
Then I clean up the inside with the Exacto knife.
Cleaning up a lot doesn’t matter a whole lot, since its on the back and inside, but I’m a perfectionist that way. It does need to be perfectly cut away, though, so they lay perfectly flat. Extra plastic from the pins in the middle that make it rock back and forth is NOT what you want. Be careful not to take too much away… the covers clip in the middle indent, so that needs to be there, and you don’t want a big gap in the middle that lets the glue seep out, either. At the end, I take a couple of quick swipes on that wet sandpaper again… just a couple, though. You don’t want to remove much material here.
Step eleven: More measuring
Lay the inserts out on the bar again, and gently set the button covers on them so you can space them out and measure the distance again. BE CAREFUL NOT TO PRESS THE BUTTON COVERS ONTO THE INSERTS FROM HERE UNTIL THE VERY END!!! Without the legs, those inserts are a REAL b#$%* to remove.
Step twelve: Reference tape
Once everything is, again, laid out perfectly, use a strip of painters tape to carefully slide under the button covers (remember, they’re not pressed on, so they’re held a millimeter or two above the surface of the bar), flush against the inserts. This is going to be your alignment guide to make sure the inserts are perfectly positioned at the right height, so they’re nice and centered on the bar. (top to bottom)
Step thirteen: Double-check the line
Sanity check your tape alignment to make sure it’s nice and straight… it’s funny (not funny) how obvious a millimeter off looks, once everything is put together. The slant is a lot more obvious than you’d think. I tweaked the line just slightly after I took this photo, FWIW, since the left edge looks a hair lower than the right.
Step fourteen: Space out the buttons
Lay out the buttons covers out on their face AGAIN (upside down), on either a piece of paper, paper towel, or some other protective surface you don’t want glue on your nice dining room table, or even your workbench), carefully measured out, and with the inserts lightly placed inside. (REMINDER: BE CAREFUL NOT TO PRESS THEM INTO THE COVERS!)
Step fifteen: Use tape to hold the button insert underside
Now the interesting part begins. Tape a piece of painters tape (I like 1” for this)and gently lay it onto the undersides of the inserts. You should be able to lift the inserts out and have them stay in the exact position they were in when you flip it over. Measure them all AGAIN and confirm everything is as straight as it should be.
Step sixteen: Use tape to hold the button insert from the top
Take ANOTHER piece of painters tape and lay it over the TOP of those inserts. Again, this should lock them into place and hold them nice and firmly. Give yourself a good extra inch or so on either side, because later you’ll want to wrap the ends around the bar to hold things in place.
Step seventeen: Release the button insert underside
Flip it over and remove the tape from the bottom, and you have all the covers nice and in place, ready for gluing.
Step eighteen: Fill the inserts with Glue
And now we glue. Use E6000 or similar slow cure, self-leveling glue. Fill each insert entirely, but be careful not to OVER-fill them.
Step nineteen: Top off the glue levels
Double check they’re completely filled, and add a little more if any corners aren’t fully filled, etc.
Step twenty: Apply the bar
Now remember that bar stock with the tape along the edge? Put that tape line right up against the buttons covers filled with glue. You should feel it easily when the tape line touches the inserts.
Step twenty-one: Flip the inserts and bar
Flip it over so the glue will go down and glue the inserts onto the bar. Double-check your alignment against that alignment tape, now that you can see it easier. You should see pretty clearly that they’re all neatly pressed against the tape reference line, and you’ll know they’re just where they should be as a result.
Step twenty-two: Remove the alignment tape and package it up for the night
At this point, once I’m sure everything is where I want it, I fold the ends of the top painters tape under the bar, to hold everything exactly in place. Remove the alignment tape and wrap it round the middle, like a belt holding it all together.
Step twenty-three: Walk away...
Leave it all out to cure overnight. You’ll want probably 10-14 hours of cure time before the next step.
Step twenty-four: Double-check alignment and measurements
After about 10-14 hours have passed, the glue will be about perfect for the next step. Too long and it’s hard to move things around, if small adjustments are needed. Too short a time, and things can just move out of place again. 10-14 hours is the perfect level of tacky but no longer slippery.
Carefully remove all the tape, and gently place the button covers on the inserts again, so you can truly measure the final positions. (don’t lock them on, remember!) While you CAN measure just the inserts, I find the nice sharp edges of the button covers area easier to measure, and the sharp lines make it more clear if anything is off.
Step twenty-five: More measuring checks
Remove the button covers and AGAIN make sure everything is aligned perfectly, and the measurements between each are perfectly consistent. Again, a half millimeter will be visibly obvious once it’s all done, so this is your last chance to fix things. If anything is off, you should be able to carefully push the inserts around as needed. The glue will allow movements without screwing anything up, at this stage. Be sure to use a straightedge to make sure everything is *perfectly* straight.
Step twenty-six: Glue cleanup
If any glue seeped out from under the inserts, now is the perfect time to clean it up. The glue is still soft enough to be easy to remove with an exacto knife, and not cured hard yet, but not so soft that it just squishes around under the blade. Be careful not to move anything around while you do this, but it should be fairly set in place, as long as you work gently. Cutting right along the edge of the inserts will scratch the bar, but not in a visible area, since the button covers will go over this area.
Step twenty-seven: Walk away again...
Now leave it somewhere safe and walk away for another 10-14 hours. The glue will cure more fully during this time, but it’s no longer so slippery that it’s likely to move out of place on it’s own.
Step twenty-eight: Attach the button covers
After a full 24 hours from the initial gluing has passed, all your work pays off. Visually look it over one last time, measure AGAIN if you want, and then you can proceed to snap the button covers fully onto the inserts, and enjoy your beautiful new rank bar.
Step twenty-nine: Apply the backing
The timing of the very last step is up to you. The glue SHOULD be pretty set at this point, but I still like to be careful (there’s a lot of glue in an enclosed space, in there). E6000 fully cures in 72 hours, so that’s my preferred time to proceed, but it really depends on how much of a hurry you’re in. I’ve done the last step sooner and been fine, just try to be gentle with the buttons a bit longer, and don’t leave them anywhere where anything is pressing on them.
But the last step is to attach whatever attachment method you’re using to the back. I use simple self-adhesive magnet bars from Amazon (see the DIY push button source thread linked at the top of this post). Just peel off the sticker backing and stick on the back of the rank bar, and you’re done. (I put something moderately heavy on top for a couple minutes to really stick the sucker on there) Some prefer push pins, which would need to be epoxied into place, but that’s all up to the end user)
Step thirty: There is no step thirty
Et fini. You're done. Stick on your costume and rock that rank!
It might not be considered that old school but for me it was definitely the Jedi Knight series, specifically Outcast and Academy, I grew up playing the life out of those games
It might not be considered that old school but for me it was definitely the Jedi Knight series, specifically Outcast and Academy, I grew up playing the life out of those games
Welcome to the forums! Jackboots are quite common to find on Etsy and eBay plus we have the vendor list on the forums, on the higher end I have heard Imperial Boots and Hessen are good and for a cheaper option, Soviet Boots
Good luck on the journey
When I joined the 501st in June, so a little over half a year now, I had no idea what I was getting myself into. However, I have to say it was probably one of the best decisions I've made to join up. I’ve always been a guy who likes to help his community while having fun in the process, after all I am an Eagle Scout, hence my name. I also love Star Wars, like most of us. So naturally. The 501st was the right place for me. When I got that approval email back from my GML. I was filled with joy! My first troop was a big convention, so it was interesting to say the least. Everyone was so welcoming and kind! I learned the ropes pretty quickly! After a few month of membership and 52 troops I have to say it was more then worth it and I can't wait for more!
I wanted to give special thanks to my squadmates in Everglades Squad and other members of the Florida Garrison I've met, you guys make trooping that much more fun! I want to thank @KaiserNash in particular because without your guidance I probably wouldn't be as active as I am! You’re a legend man and an awesome SL, couldn't ask for better!
To all the staff and members on the IOC, this is an excellent community we have cultivated! If someone makes a post a minute later someone responds ready to help! My thanks to everyone who has helped me on here! I highly recommend every approved member makes a troop log if they haven't already. It's super cool to see what people are doing around the world! Plus you get a cool badge!
Have a fun and safe new year and lets make 2020 a great year!
ID- 61601
Thomas Hagin
Let's start with the question of why Pryce gets one. Simply put her uniform is 100% different. Animated uniforms in general are 100% different from the movies.
I can't just wear my normal green suit and say "I'm Kassius Konstantine", the rank bars and code cylinders are different shapes, the boots aren't perfect matches, the collars have those black marks on them, the hat disks and belts are totally different. There's nothing I can use from my movie uniform and have it be approved as an animated officer.
What's different between Veers, Piett and Needa? Number of code cylinders and rank bar tiles. "But Ozzel has a mustache!" He sure does, but his uniform and accessories are exactly the same as every other officer in the original trilogy. "But Motti and Tagge don't wear hats!" You're right, we don't see them wearing hats and many others in A New Hope are hat-less. But the uniforms and accessories themselves are the same as all the others. "But Tarkin gets his own CRL!" You're right, he does, and about 95% of his uniform is exactly the same as all the others. But he has the dress shirt under his uniform and a very specific hair style and facial features. Admittedly that doesn't really seem like enough to warrant a whole separate CRL, but if I go troop an event as Veers, and halfway through I decide to change up my code cylinders and rank bar and walk back out as Piett that's a 5 second change. If I start an event as Tarkin and want to change to Jerjerrod I'd have to wash my hair, clean off my old man makeup, take off the dress shirt under my tunic, add a hat and change up all the other accessories. Not as simple/quick.
But for arguments sake lets say the Detachment Leader decides to publish a Veers CRL. Great. Now people want Motti, and Tagge, and Piett both admiral and captain, and Khurgee... the list is endless and all we're doing between those CRLs is changing accessories, facial hair, and hair styles. That's just a nightmare for the detachment staff, LMO team, and webteam.
My proposed counter idea would be to have character specific galleries in the CRL similar to the TIE Pilot helmet detail examples - https://databank.501st.com/databank/Costuming:TI_TIE_Pilot_Helmet-detail
Similar idea, just list named officers and show an image of their accessories and a small text description example: General Veers - X# of code cylinders in X style, rank bar is X rows with X red tiles and X blue tiles
I understand the want to be an officially approved Veers vs. just a line officer, but there's nothing stopping any of us at a troop saying, "Hi, I'm General Veers" when talking to fans.
Some of you may know, but many likely do not, but I just got married this summer. And, as both of us were huge Star Wars fans, we had... lets say, a themed wedding. It was really great. I dressed up as my Grand Admiral, my best man and all my groomsmen were Officers. Even the bridesmaids wore rank bars, and Krennic (who is also our friend) did the ceremony. We also invited my Garrison to come out and walk down the aisle with us. It was spectacular, and I thought some of you would like to see the pictures. All photo credits go to JRush Photography.
We even had a Star Wars cake!! And it was delicious!!
“Ladies and Gentlemen, this is your cabin manager speaking, we are ready for takeoff, please put your seats in the upright position and tray tables stowed away with your seatbelt fastened” ID22008, Redback Garrison
Some photos that we took over one of the weekend and we wanted to have some fun shots! and I used the Disneyland rank bar that they had. I pretty happy that the size looks pretty good.
As we wanted to do one photo on wearing a dress or a skirt with our officer outfit. So early on I did a inspired imperial Officer dress with a high slit after I saw the Solo movie on the officers socializing at the crimson dawn party. So just wanted to have a inspired dress for female imperial Officer.
No question my 2 favourites are Jedi Knight 2 and Jedi Academy, can't beat the sabre mechanics in that game, it was what defined my childhood in gaming, as for modern games probably would have to be Battlefront 2, as they have fixed pretty much all the issues from launch and is an extremely fun game, but not as good as the classics


 Sharpshooter reacted to buckrogersbarker in Imperial Military Officer (Non-Saga), green
 Sharpshooter got a reaction from CommanderBlaze318 in Uniform help
 Sharpshooter got a reaction from Harves4556 in So you wanna be on Facebook? How about Twitter?
 Sharpshooter got a reaction from ImperialDirector in So you wanna be on Facebook? How about Twitter?
 Sharpshooter got a reaction from Brennes in Fabric for green Moff Uniform
 Sharpshooter got a reaction from TK1571 in Favourite old school Star Wars game
 Sharpshooter got a reaction from LordMalexit in ID 90886, new LMO assigned to the IOC
 Sharpshooter got a reaction from GiuliaEclipse95 in So you wanna be on Facebook? How about Twitter?
 Sharpshooter got a reaction from Hask in ISB Agent (BF2)
 Sharpshooter got a reaction from Paggeldiwwer in Favorite non star wars movie
 Sharpshooter got a reaction from Frank75139 in New guy here
 Sharpshooter got a reaction from ID19728 in Approval
 Sharpshooter got a reaction from shadan in Approval
 Sharpshooter got a reaction from PArmstr in Favorite Star Wars Video Game?
 Sharpshooter got a reaction from DarthFunk83 in A Very Special Day
 Sharpshooter got a reaction from Kalak in Favorite Star Wars Video Game?